Reading from a Google Sheet
- Megan Ellis
frevvo forms can be initialized with data from a Google Sheet by retrieving the data from the spreadsheet using a business rule. Rule syntax and best practices to follow are discussed in the Writing Rules to Retrieve and Update Data in a Google Sheet topic.
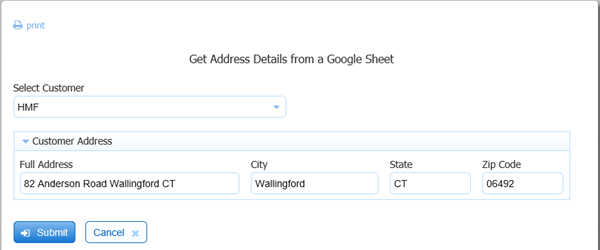
The example discussed below uses a form that has a dropdown control to select a customer from a list. Once selected, a business rule queries a Google Sheet and retrieves the full address details for the selected customer. City, State, and Zip Code controls are also populated with the customer information.
On This Page:
Example 1 - Populate form fields with data from a Google Sheet
Step 1: Obtain an access token for your Google Account
If you do not have an access token for the Google Account where you are going to create your spreadsheet, perform this one-time step.
Follow these steps to obtain your Google Account token.
Login to your Google Account
Go to:
Cloud customers: https://app.frevvo.com/google/consent
- In-house customers: http://<your frevvo server domain name>/google/consent
Click Allow if you see a screen like the one below (Google often updates their UI so this may differ from what you see).
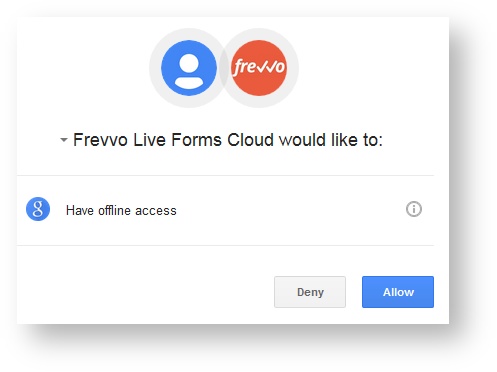
Copy the access token. Save it to a safe location, you will use it when configuring your forms/workflows.
- You must obtain a Google access token for every Google Account you wish to use with your forms/workflows. Repeat steps #1-4 above for each Google Account.
- In-house customers with multiple servers must obtain Google Access Tokens for each server / Google Account.
- Google limits the number of access tokens per Google Account. If the token limit is exceeded, older refresh tokens stop working.
- Google may revoke Access Tokens unused for ~6 months. If this happens you must obtain a new token and update your forms/workflows.
Escape the slash characters in your OAuth token with a backslash in the rule below like this: OAuth21\/\/<###...>
Step 2 - Create your form
Create a simple example contact form with a few fields. Note the Select Customer control is a dropdown. If you need help creating a form, check out the Quick Demo and Form Designer tutorial videos on our website.
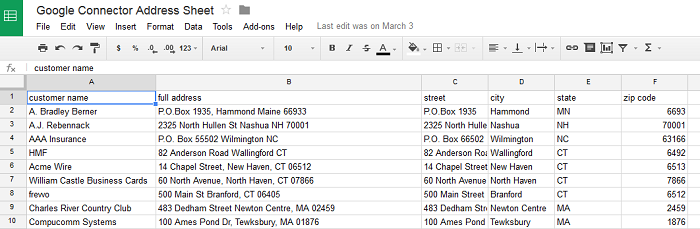
Step 3: Create your Google Sheet
Create a Google Sheet containing the customer address details. The column name on a sheet must match the control name. The matching is case-insensitive and any spaces in the column name is ignored. When you reference the column name in the rule, use only lower case and no spaces.
| Control Name | Column Header | Column Header in Rule |
|---|---|---|
| CustomerName | customer name | customername |
| FullAddress | full address | fulladdress |
| Street | street | street |
| City | city | city |
| ZipCode | zip code | zipcode |
Copy the Spreadsheet key to use in the Business Rule
It is best practice to use the spreadsheet key in your business rule to specify the Google sheet. This method is recommended because each spreadsheet has its own unique key. Using the key instead of the spreadsheet/worksheet name avoids issues that may occur if you have more than one spreadsheet with the same name.
The Google connector supports the use of the key as a path parameter:
- key - the GUID of your Google sheet. Use the key to specify your Google sheet instead of the sheet name (ssname) in your rule.
- To find the Google sheet key,
- Open your Google sheet.
- The key is the long string of characters between the d/ and the /edit in the URL in the address bar.
Ex: https://docs.google.com/spreadsheets/d/1FXYb7PJpozlFcJol12YNEwhFFwa-tvpO6OjU1wzxDTI/edit?usp=sharing
Step 4: Add the Business Rule
This business rule calls the Google Connector to retrieve the address details from a worksheet named Sheet1 in the Google Sheet associated with the Google Sheet key provided.
/*member fulladdress, city,results, state, zipcode, password, user*/
var x;

var headers =
{"user":"<Google user id>","password":"<Google Account access token>"};
var readquery = '/google/spreadsheets/query/key/<your spreadsheet key>?wsname=Sheet1&query=customername="' + Customer.value + '"';
  eval('x=' + http.get(readquery,headers));

if (x.results == null) {
    FullAddress.value = 'error';
} else if (x.results.length === 0) {
    FullAddress.value = 'No Match';
} else {
    FullAddress.value = x.results[0].fulladdress;
    City.value = x.results[0].city;
    State.value = x.results[0].state;
    Zipcode.value = x.results[0].zipcode;
}
Let's take a look at the components of this rule:
- The Google user id and access token for the password are supplied via user and password headers. Note the line beginning with var headers =. If you want to try this example with your own Google sheet, change <Google user id> to your Google account user name and <Google Account access token> to the access token for your account.
- On Premise customers need to also specify the server and port where their Google Connector is hosted. The query url will start with '<YourServer:Port>/google/spreadsheets/'.
- The path parameter, /key, is used to provide the spreadsheet key to identify the spreadsheet.
- The following URL query parameters are used:
- wsname - the rule queries the worksheet (tab) of the Google Connector Address sheet named Sheet1. To connect to your Google sheet, change Sheet1 to reflect the name of the worksheet (tab) in your Google Sheet.
- query=<query string> - This is where you specify which rows to match based on the data in your spreadsheet. The query parameter selects row(s) from the spreadsheet which match values in specific columns. In this example the spreadsheet has a column named 'customer name'. The query parameter retrieves the spreadsheet row where customer name equals the name we select in our form's dropdown control name 'Customer'.
- The http.get returns all the values from the matched row(s) to a variable named "x.results". The rule checks for null which means that no row matched the selected customer.
A few important notes:
- The Google spreadsheet column name is 'customer name'. When you pass this to the query, remove spaces as you see above query=customername. Any references to Google Sheet columns in your rule MUST be lower case and have all spaces removed.
- If you have spaces in your worksheet or Google Sheet name, do not remove them.
- Notice the double quote characters in the query string added around Customer.value. This is important in cases where your data contains spaces, you need to surround them with double quotes.
- You will always get back an array even for 1 result.
- If there are no results, the returned JSON Object x.results will be null
Example 2 - Read from a Google Sheet using OR condition
The query string supports 'and' and 'or' logic. This query will retrieve all rows where the customer lives either in MA or CT. The rule concatenates all the addresses into a text area control named FullAddress when the form loads.
If you want to try this example with your own Google sheet, remember to change the <Google user id> and the <Google Account access token> to reflect your Google account information. Change <your spreadsheet key> to the key for your Google sheet and <your worksheet name> to the name of the tab in your Google sheet.
/*member fulladdress, results, password, user*/

if (form.load) {
  var x;
  var opts= [];

var headers =
{"user":"<your Google id>","password":"<your access token>"};
var readquery = '/google/spreadsheets/query/key/<your spreadsheet key>?wsname=<your worksheet name>&query=state=MA or state=CT';
  eval('x=' + http.get(readquery,headers));

var fi = '';
if (x.results == null) {
    fi = 'Error';
} else if (x.results.length === 0) {
    fi = 'No Match';
} else {
    for (var i=0; i < x.results.length; i++) {
        fi = fi + '\n' + x.results[i].fulladdress;
    }
}
FullAddress.value = fi;
}
If your Google Sheet has this data, then your form will look like the image to the right when the form loads and the rule runs.
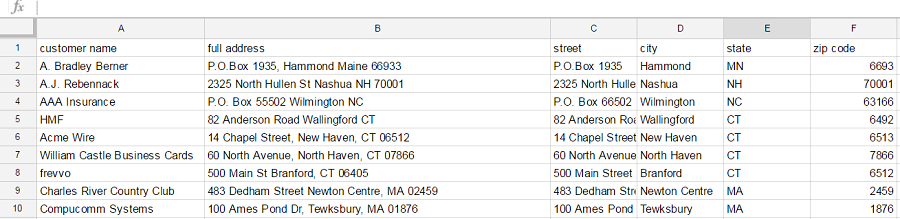
Google Address Spreadsheet
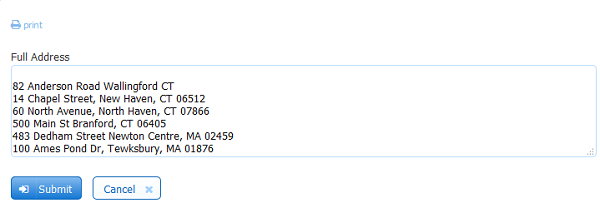
Form showing only customer addresses from CT or MA
Example 3 - Generating Sequential Numbers from a Google Sheet
The Google Spreadsheet connector can also be used to generate unique sequential numbers. This technique should not be used if you have multiple people using the form at the same time as it's possible that two people simultaneously opening the same form could get the same sequential number.
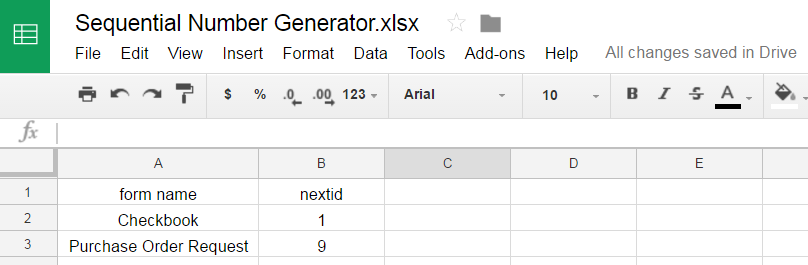
In this example we have a checkbook form where we want to initialize a field named CheckNum with the next sequential checkbook number when the form loads. Here is our Google spreadsheet:
Here is the rule that reads the next sequential number from the spreadsheet and updates plus 1. Note this rule uses http headers to provide authentication information, access the Google sheet using the key, and passes the worksheet name as a query parameter. This is the recommended approach.
- Replace <Google User ID> and <Google Account access token> with your information in the user and password headers.
- Replace <your spreadsheet key> with the key for your spreadsheet in the readquery and update statements.
- Replace <the name of the worksheet tab in your spreadsheet> with the name of the worksheet (tab) in your Google sheet in the readquery and update statements.
/*member nextid, password, user, results */
var x;
if (form.load) {
    var headers =
        {"user":"<Google User ID>","password":"<Google Account Access token>"};
    var readquery =
        '/google/spreadsheets/query/key/<your spreadsheet key>?wsname=<the name of the worksheet tab in your spreadsheet>&query=formname="Checkbook"';
    var update =
        '/google/spreadsheets/update/key/<your spreadsheet key>?wsname=<the name of the worksheet tab in your spreadsheet>&query=formname="Checkbook"';
    eval('x=' + http.get(readquery, headers));
    var id = 'unknown';
    if (x.results === null) {
        CheckNum.value = 'error';
    } else if (x.results.length === 0) {
        CheckNum.value = 'No Match';
    } else {
        id = x.results[0].nextid;
        CheckNum.value = id;
        id = id * 1 + 1;
    }
    if (id !== 'unknown') {
        eval('x=' + http.put(update + '&updates=nextid=' + id, null, headers, false));
    }
}
The rule reads the number in the nextid column of the spreadsheet and populates the Checknum field in the form when the form loads. It then adds 1 and updates the nextid column in the spreadsheet. The Checknum field for the next user to load the form is populated with the incremented value.
Remember that On Premise customers need to also specify the server and port where their Google Connector is hosted. The query url will start with '<YourServer:Port>/google/spreadsheets/'.