Installing the Google Connector
- Megan Ellis
The Google Connector supports Oauth2 - Open Standard for authorization. This requires the account holder to provide consent to the Google connector to access data on their behalf. This is a manual process and must be done for each Google account associated with the connector.
Cloud Customers
Cloud customers using the Google Connector for the first time will need to:
- Sign up for a Google Account
- Obtain Google Account Access Token(s).
In-house Customers
In-house customers will need to:
- Check the Google Connector Release Notes for more information and the compatibility matrix.
- Install/Upgrade the Google Connector.
- Sign up for a Google Account.
- Obtain Google Account Access Token(s).
On this page:
Installation
Installing the Google Connector is a one time process for frevvo In-house customers. The latest version of the connector is installed for all frevvo Online cloud hosted customers, so you can skip the Installation step.
Follow these steps to install the Google Connector: These instructions assume that you have an in-house installation of frevvo v9.0+ up and running.
Download the Connector
Make sure the version of frevvo is compatible with the version of the Google Connector you are installing. View the compatibility matrix to check the versions. If you are not using the correct version of frevvo, first upgrade your frevvo server software.
Stop frevvo.
Download the compatible version of the Google Connector from our frevvo Software Download Directory. Extract the .zip file to a temporary location. Copy the google.war to c:\<frevvo-home>\tomcat\webapps.
If you are running frevvo on your local machine, you must set a domain name for your machine - otherwise, you can skip this step.
If you are currently using a previous version of the Google Connector and you want to upgrade, follow these steps if you are using the Tomcat bundle:
Ensure you have downloaded the supported version of OpenJDK. Check Supported Platforms before beginning.
Stop frevvo
Download the Google Connector.
Rename the google-connector-2.3.1.war to google.war and replace the existing one in <frevvo-home>\tomcat\webapps.
Delete the <frevvo-home>\tomcat\webapps\google directory. If this directory is not deleted then the Google Connector will run from the old directory and the newer version won't take effect.
Continue with step 5.
Ex: For Windows edit the C:\WINDOWS\system32\drivers\etc\hosts file as an administrator and modify the 127.0.0.1 entry with a domain name:
127.0.0.1 example.com
Set Up a Project in Your Google Account
Go to https://console.developers.google.com. Login to the google account that you are going to use with the Google connector. View this Google documentation to help you set up your project: https://developers.google.com/adwords/api/docs/guides/authentication, or follow the steps below. If you have a Location Group/Business Account your Google Domain admin will need to set up the organization and give the frevvo user permission to add projects to it. Please see this google documentation for details.
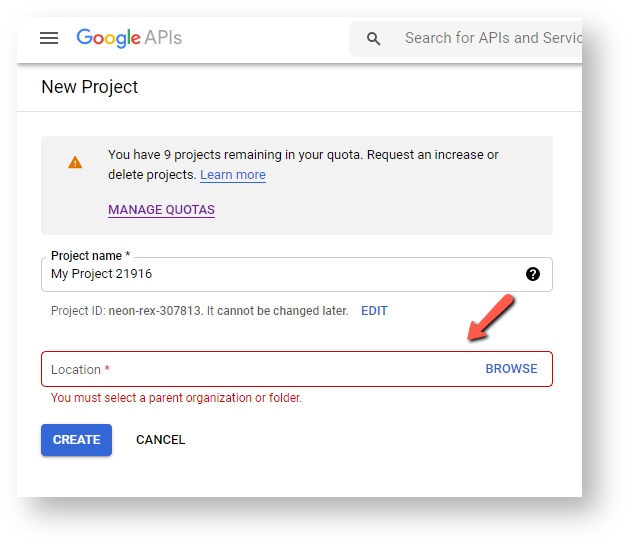
- Create a new project.
- Enable the Google Drive API named Drive API.
- Enable the Google Sheets API named Sheets API.
- Select the email address you want to associate with this project on the OAUTH consent screen. Provide a project name. Click Save.
- Go to Credentials - Create new client ID
- The Consent screen must contain a product name and email address before continuing.
- Application Type = Web Application
- Authorized Javascript Origins = Empty
- Authorized Redirect URIs = http://<DOMAIN_NAME>/google/credential. Replace <DOMAIN_NAME> with your domain name. If you are using localhost, this name must match the entry in your hosts file and you must provide the port number.
- Click Create Client ID.
- Click the Download JSON file. The credentials from this file (client id and client secret) become available to the Google Connector as a property in the frevvo-config.properties file.
Add Credentials to the Connector
There are several options to configure the connector with the credentials you downloaded in Step 7 above.
- If you do not have a file named frevvo-config.properties in <frevvo-home>\tomcat\conf, you can rename the JSON file to frevvo-config.properties.
Edit the file and append the prefix client.secrets= to the file content.
client.secrets={"web":{"client_id":"1042723840399-112fedk6nurt8j657rl4etl8441m3evf.apps.googleusercontent.com","project_id":"maryann-domain","auth_uri":"https://accounts.google.com/o/oauth2/auth","token_uri":"https://accounts.google.com/o/oauth2/token","auth_provider_x509_cert_url":"https://www.googleapis.com/oauth2/v1/certs","client_secret":"E1P4VRTudW7mXZ7Pps5hsm5C","redirect_uris":["http://maryann.com/google/credential"]}}- Save the file. Make sure the file type is changed from json to properties.
- If you already have a file named frevvo-config.properties in <frevvo-home>\tomcat\conf directory, then copy the information from the json file and add it to your existing frevvo-config.properties file.
Append the prefix client.secrets= to the pasted content from the json file
client.secrets={"web":{"client_id":"1042723840399-112fedk6nurt8j657rl4etl8441m3evf.apps.googleusercontent.com","project_id":"maryann-domain","auth_uri":"https://accounts.google.com/o/oauth2/auth","token_uri":"https://accounts.google.com/o/oauth2/token","auth_provider_x509_cert_url":"https://www.googleapis.com/oauth2/v1/certs","client_secret":"E1P4VRTudW7mXZ7Pps5hsm5C","redirect_uris":["http://maryann.com/google/credential"]}}- Save the file. Make sure the file type is changed from json to properties
- You can also
- Rename the JSON file as client_secrets.json
- Copy it to tomcat/lib folder
- Create/edit the frevvo-config.properties in <frevvo-home>\tomcat\conf directory. Add the client.secrets= property to this file without a value e.g. client.secrets=
There are two alternative methods to setting the client_ secret property in the frevvo-config.properties file. You can:
- Set the client_secrets environment variable. The image below shows this environment variable set for a Windows system. (See Secure Passwords in Tomcat for more information.)

- Set the -Dclient.secrets= <your client secret> configuration parameter in the <frevvo-home>\tomcat\bin\setenv.bat,sh files
Configure Connector Location
If your frevvo external HTTP port is any port other than Port 8082, you must add the frevvo.google.connector.url property to the frevvo-config.properties file in <frevvo-home>\tomcat\conf directory to set the location of the connector. This property defaults to frevvo.google.connector.url=http://localhost:8082/google. For example, if your external HTTP port is Port 80, add this property:
frevvo.google.connector.url=http://localhost:80/google
Start frevvo
- Start the Insight server, then start frevvo.
- Paste this url in your browser: http://<DOMAIN_ NAME>/google/health to check the Google Connector status. Provide your domain name and the port number if you are running locally. You should see a {"status":"UP"} message.
The google.war installation is now complete.
Google Connector Logfile
If you are using the frevvo tomcat bundle, the Google Connector log is located in <frevvo-home>\tomcat\logs. The logfile is named google-connector.YYYY-MM-DD.log. Generating separate logfiles make it much easier to search for errors when troubleshooting connector issues. The connector is designed to use the frevvo-config.properties file.
The Google connector logfile defaults to INFO loglevel. To configure DEBUG level logging for the Google connector log:
- Stop frevvo
- Create/edit a frevvo-config.properties file in <frevvo-home>\tomcat\conf
- Add the logging.level.com.frevvo.connectors.google=DEBUG property to the file or add the logging.level.=DEBUG to see DEBUG messages in the frevvo and any connector logs.
- Save the file
- Restart frevvo
logging.level.com.frevvo.connector.google=DEBUG
Generate the Google Connector log in JSON format
Logging output defaults to text format. To switch to JSON format, add this property to the frevvo-config.properties file.
spring.profiles.include=logging-json