This documentation is for Live Forms 9.1. v9.1 is a Cloud Only release. Not for you? Earlier documentation is available too.
COVID-19 Response Info: At frevvo, our top priorities have always been employees and customers. We have taken several steps to promote the well-being of our people, to minimize services disruptions, and to help where we can. Visit our website for updates.
Forms
- Former user (Deleted)
- Megan Ellis
If you close your browser window/tab and open the form via the share URL again, you will again get a blank form.
On this page:
Making Forms and Workflows Public
The Visibility setting determines who can see and use a form, and whether other users can access your forms. You can set this property on the Forms and Workflows Home Page by clicking on the
![]() Action Menu for the form/workflow and selecting
Action Menu for the form/workflow and selecting ![]() Security. Fill out the Access Control screen. You can also display the Access Control wizard by clicking the
Security. Fill out the Access Control screen. You can also display the Access Control wizard by clicking the ![]() Access Control tab on the Form/Workflow Designer properties panel or wizard.
Access Control tab on the Form/Workflow Designer properties panel or wizard.
Sharing Forms and Workflows
When you select ![]() Share from the Action Menu to share your form, you will see a Share Form page with share options at the right. Three options (Embedded Form, Full Page/Pop Up and Just the iframe) are different ways to let users submit the form from your website without having to navigate elsewhere. These options have associated code on the left which can be cut and pasted into your website. Specific instructions for the code also are provided.
Share from the Action Menu to share your form, you will see a Share Form page with share options at the right. Three options (Embedded Form, Full Page/Pop Up and Just the iframe) are different ways to let users submit the form from your website without having to navigate elsewhere. These options have associated code on the left which can be cut and pasted into your website. Specific instructions for the code also are provided.
Be sure to select ![]() Share from the Action Menu to share your form/workflow or add it to a web page. Do not use the browser URL you see when you're running or testing a form — this URL represents an ''instance'' of the form, not the actual form itself.
Share from the Action Menu to share your form/workflow or add it to a web page. Do not use the browser URL you see when you're running or testing a form — this URL represents an ''instance'' of the form, not the actual form itself.
When you run or test a form, you'll notice that the browser URL includes a -extID parameter (for example, .../popupform?embed=true_extId=0.5427066243050674). This means that it's an in-memory instance of the form. You can use the _extID parameter yourself if you want to collaborate with others on an instance of a form. See the _extID topic for more information.
Share Links for Forms

Share Links for Workflows
The two Link options give you a link to the form/workflow. You can send the link in an email or publish it on your web page.
Each option is discussed below. Remember to make your form public or users won’t be able to access the form no matter which method of sharing you choose.
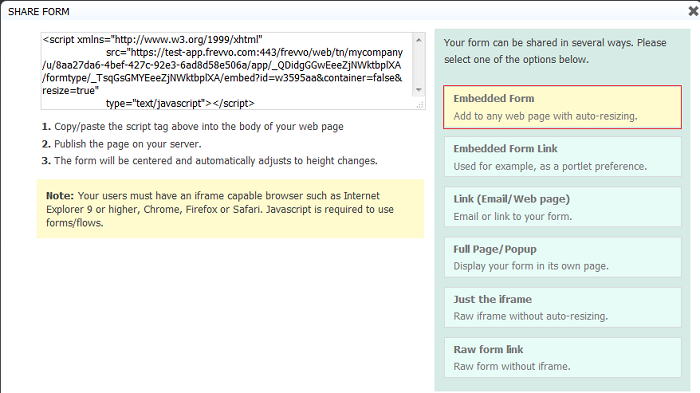
- Embedded Form – This option enables you to embed a form that will be displayed in your website. Simply copy and paste the code into your web page where you want the form to appear.
takes care of the rest. This option will render the form on your Web page in its entirety, without requiring users to click scroll bars when using the form. You cannot control the height nor the width that the form will use on your web page when embedded in this fashion. The length used by the form automatically resizes as repeats are added and sections expanded/collapsed or made visible/invisible. Refer to the Embedded Form/Workflows on Mobile Devices topic for the details regarding mobile devices.
- Embedded Form Link – This option should be used to embed your form into a Portlet container.
- Full Page/Pop Up – This lets users access the form in its own pop-up window so users can complete the form and return to your Web page when they are done. It is intended for desktop only.
- Link (Email/Web Page) – This lets you add a link to your form on your Web page or simply email the link to the people whom you want to submit your form.
- Just the iframe – This is similar to the Embedded Form option but requires you to specify your form’s width and height. In fact the script tag is the same except it has different form Url parameters. For instance Just the iframe option does not contain center=true, so the form will not be centered nor have a border. Using this option, the user may see scroll bars when they use your form if you do not specify a height long enough to contain the form when it is fully expanded. (Remember that your form can "grow" from its initial height if users select repeat items, expand sections that are initially collapsed, and so on.) The height and width are form properties but the height property generally is blank since the form sizes dynamically when you design it. There are a number of freeware tools (for example, MeasureIt) that you can use to measure your form’s height.
- Raw Form Link – This lets you email a link to the form just as the Link (Email/Web Page) option does, but it is intended for filling out a form collaboratively and requires coordination between the parties filling out the form. The first person can fill out a portion of the form but must make sure '''not''' to submit it. He or she then can copy the URL (which will have been updated to collect the entered data) and mail this updated URL to the next collaborator. When this person accesses the URL, the form will be displayed with the values entered by the previous collaborator. The other difference between this option and the Link (Email/Web Page) option is that this option does not include an iframe border decoration.
Keep in mind that if you have shared your form via one of the link options and subsequently marked your form private, users will see an error message: "Access denied. Are you trying to access a private form/workflow?"
Locate a Form or Workflow using the Share URL
resources, Projects, Forms, Workflows, Spaces and more are referenced with opaque URLs. Use of opaque URLs eliminates security issues that may have been present with URLs that exposed a designer user's id. Opaque URLs replace the user id (…/user/user.id/…) that was used in the previous format with a universally unique identifier (uuid) …/u/user.uuid/… The uuid, is a randomly generated value that is stored in
.
The Opaque URL feature provides:
- URLs that do not include a user's id
- Backward compatibility for URLs that contain a user's id - they will continue to work.
- A reverse lookup function of the opaque URL that can be used to locate a form/workflow in a user's account for troubleshooting purposes. This capability is only be available to administrators, tenant administrators and users with the designers or publishers roles in the same tenant.
An example of the opaque URL for a space named mycompany is shown below:
OLD SPACE URL: http(s)://<server>:<port>/frevvo/web/tn/mycompany/user/designer/space/mycompany
NEW SPACE URL: http(s)://<server:port>/frevvo/web/tn/mycompany/u/8aa27da6-4bef-427c-92e3-6ad8d58e506a/space/mycompany
The opaque URL can be used to determine the designer account where a form/workflow is located. This "lookup" feature resolves the uuid to a user's id and can be very helpful when troubleshooting. The "lookup" feature is only available to tenant admins, users with the designer/publisher role or the designer/owner of the form/workflow.
The "lookup" feature works with:
- Type URLs - URLs that include formtype or flowtype in the path - Form/Workflow Share URLs
- URLs that include the form or workflow id in the path
- Instance URLs - browse the Share URL and hit enter
In all cases, follow these steps:
- Browse the opaque Share or instance URL
- Remove everything in the URL after the formtype, flowtype, form or workflow id path segments
- Append/lookup to the end of the URL
Example 1:
A user receives an email that includes an opaque URL to a form/workflow as shown below. The user reports an issue with the form/workflow and requests that the designer investigate. The designer must locate the account where the form/workflow is located.
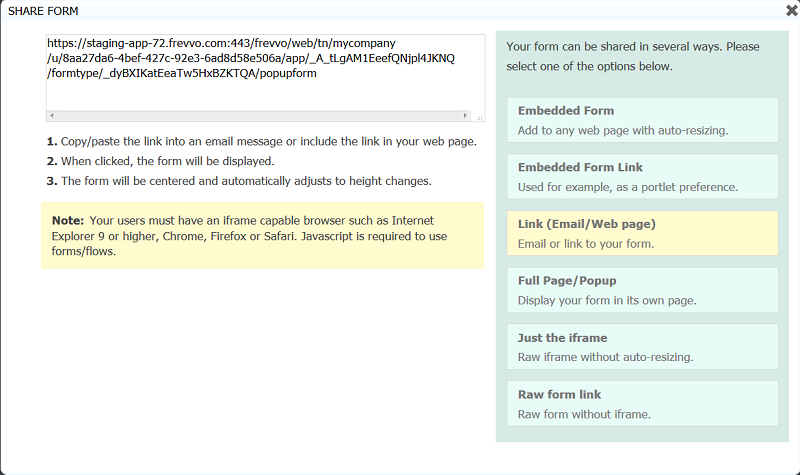
https://staging-app-72.frevvo.com:443/frevvo/web/tn/mycompany/u/8aa27da6-4bef-427c-92e3-6ad8d58e506a/app/_A_tLgAM1EeefQNjpl4JKNQ/formtype/_dyBXIKatEeaTw5HxBZKTQA/popupform
Paste the opaque URL into your browser. Remove popupform from the URL and replace it with lookup after the slash.
https://staging-app-72.frevvo.com:443/frevvo/web/tn/mycompany/u/8aa27da6-4bef-427c-92e3-6ad8d58e506a/app/_A_tLgAM1EeefQNjpl4JKNQ/formtype/_dyBXIKatEeaTw5HxBZKTQA/lookup
Press the Enter key. Login to the tenant (determined by the tenant name after the /tn in the URL) as an admin, designer or publisher user if presented with the login screen.
The following information about the form/workflow display in the browser:
Tenant: mycompany
User: designer
Project: HR
Form: Invoice
Example 2:
A designer must make changes to a form/workflow in their company space at the request of a co-worker. The requesting employee logs into the company space, selects the form/workflow from the menu and copies the form/workflow instance URL from the browser. An opaque URL such as the one shown below is emailed to the designer. The designer can't remember what user, app, form/workflow name that opaque url maps to and uses the lookup feature to find the form/workflow they need to fix/enhance.
https://staging-app-72.frevvo.com/frevvo/web/tn/mycompany/u/8aa27da6-4bef-427c-92e3-6ad8d58e506a/space/mycompany?mi=12&_formTz=America%2FNew_York&locale=en_US,eng_US,eng,en
Paste the opaque URL into your browser. Remove everything after the uuid. Replace it with lookup after the slash. Press the Enter key. Login to the tenant (determined by the tenant name after the /tn in the URL) as an admin, designer or publisher user if presented with the login screen.
https://staging-app-72.frevvo.com/frevvo/web/tn/mycompany/u/8aa27da6-4bef-427c-92e3-6ad8d58e506a/lookup
The uuid is converted to the user id of the designer who owns the space.
https://staging-app-72.frevvo.com/frevvo/web/tn/mycompany/user/designer
Login to the tenant as the specified user and edit the space menu to get the raw form/workflow link. Remove everything after the formtype, flowtype, value in the opaque Raw Form/Workflow link. In the example shown, you would remove all characters starting with the question mark ![]() .
.
https://staging-app-72.frevvo.com:443/frevvo/web/tn/mycompany/u/8aa27da6-4bef-427c-92e3-6ad8d58e506a/app/_ngEekDxNEeWSMvnDVXXIRg/flowtype/_DxUxwZ8eEeScQa8_3O7FuQ?_method=post&embed=true
Add /lookup to get the project and form/workflow name.
https://staging-app-72.frevvo.com:443/frevvo/web/tn/mycompany/u/8aa27da6-4bef-427c-92e3-6ad8d58e506a/app/_ngEekDxNEeWSMvnDVXXIRg/flowtype/_DxUxwZ8eEeScQa8_3O7FuQ/lookup
The workflow named Example 3 - PO for Sales Review is located in the tenant mycompany, in the designer user account, in the project Purchase Order Completed.
User: designer
Application: Purchase Order Completed
Workflow: Example 3 - PO for Sales Review
In versions prior to v9.1 Projects were known as "Applications." The /lookup parameter will still return "Application" as a result populated with the Project name.
Anonymous Access to Public Forms/Workflows in Container Managed Tenants
If you are using a tenant configured for a container security manager and you want to allow anonymous access to your forms/workflows, you must manually add "public" to the link to make forms/workflows accessible to users who are not logged in. You must do this if you are using any of the URL types in the Share dialog for forms and workflows, using a Space or embedding forms/workflows in your website. The public URL allows the tenant to be secured while public forms can be accessed anonymously, ex: a job application on an external website.
Here is an example of a public url used to access a form in a container security managed tenant. The form/workflow visibility is set to public via the Access Control feature. Anonymous users will be able to access the form as the servlet container will ALLOW access to the frevvo.war and
' access control will ALLOW access to the form. Close/open your browser or copy/paste the public url into another browser when testing.
http://10.0.0.6:8082/frevvo/web/public/tn/ldcsm/user/nancy/app/_KOSm0eEAEeOF6Nc8pkcCvQ/formtype/_OeWt0OEAEeOF6Nc8pkcCvQ/popupform
You will not see the public url listed in the Share light box.
If you are using a tenant configured for a container security manager and you want to allow anonymous access to your forms/workflows from your website, you must create a public URL.
Browser Session Security
When you create a new form, by default it is marked as Designers/Owner Only. At this time the only person who can use the form via any of the form's share choices, is the person logged into this account. Once you are ready to let others use your form you can mark the form as Anyone (no login required). Now anyone that is given the form's URL via any of the form's share choices, has access to use and submit the form.
Designer/Owner Only vs Anyone (No login required) appear to be a binary choice. Either no one has access unless you're logged into the account or everyone has access without the need to login. Another way to make the form accessible is to leave the form locked and share it via browser session restricted access. The
API can generate form URLs that are only valid for the current browser session. The form/workflow URL generated in this way (not via the Share choices) cannot be passed to anyone outside of the session as it will not work
Embedding Forms in Your Website
can easily be added into your existing web site. The option above in the Share section explains the code you need to copy into your web page and the different ways that the forms can be added to your site.
Embedding Multiple Forms in a Single Web Page
If your web server and form server are in the same domain (in-house likely scenario), you are able to embed as many
forms into each of your .html web pages as you wish. In order to do this you must give each form a unique id. So if you copy the Share code into the web page a 2nd time, you must edit id to make them different from the 1st copy/paste. Id can be any string as long as it is unique.
<script xmlns="http://www.w3.org/1999/xhtml"
 src="http://localhost:8082/frevvo/web/tn/mycompany/u/a700f434-969e-432a-9779-655f9fc30259/app/_QDidgGGwEeeZjNWktbplXA/formtype/_ZL1mkIhDEeeRWfMSX8Dr0Q/embed?id=form1&container=false&resize=true"
 type="text/javascript">
</script>

<script xmlns="http://www.w3.org/1999/xhtml"
src="http://localhost:8082/frevvo/web/tn/mycompany/u/a700f434-969e-432a-9779-655f9fc30259/app/_QDidgGGwEeeZjNWktbplXA/formtype/_ZL1mkIhDEeeRWfMSX8Dr0Q/embed?id=form2&container=false&resize=true"
type="text/javascript">
</script>
If you experience problems with your web page not resizing correctly to accommodate multiple embedded forms, try setting the height of the form manually. Open the form in the Forms Designer, click the Style tab in the Properties panel, and and type a value in pixels (for example, ''720px'', ''900px'', etc.) in the Height field to set the form height.
Currently does not support the ability to embed multiple
forms in a single .html web page iin a cross domain configuration. This is the SaaS scenario, where the
is hosted on app.frevvo.com and your web site is on another domain. In this scenario you currently can only embed a single form into each of your .html web pages.
For this version, embedding the task list successfully into an HTML page requires setting its width. See URL Parameters for more details.
Embedded Forms/workflows viewed on Mobile Devices
By default, forms will display inside your web page in a frame. On mobile only, you can use the showLink URL parameter to display the form as a clickable link or thumbnail instead. The web master can customize the share link using the URL parameters described below.
- showLink - If false (default), show the form in a frame. If true, show as a link and the parameters listed below can be used to customize the link.
- linkId - id to be applied to the rendered anchor (<a>) tag. If none supplied the id will be a generated unique id.
- linkClass - a space delimited list of one or more classes to be applied to the rendered anchor (<a>) tag. This can be used by the third-party web page designer to style the tag/link.
- linkTitle - any title text to be applied to the rendered anchor (<a>) tag. This will be seen as a tooltip when hovering with the mouse. If not supplied, then the form name will be used.
- linkLabel - any text to be used as the link. If not supplied, then the form name will be used.
- linkTarget - if set then the form will be opened in a new tab/window. Can be any text and is the name of the target window.
- linkThumbnail - if set to 'true', then the form's thumbnail will shown as the link on the web page.
- imgWidth - if linkThumbnail=true, then the width of the thumbnail image. Any css units are acceptable.
- imgHeight - if linkThumbnail=true, then the height of the thumbnail image. Any css units are acceptable.
If the iframe is not properly sized to the viewport on your mobile device, add the following meta tag between the <head> elements in the HTML.
<head>
	<meta name="viewport" content="width=device-width, initial-scale=1.0, maximum-scale=1">
</head>
Here is an example of HTML with the meta tag and embedded script:
<!DOCTYPE html>
<html xmlns="http://www.w3.org/1999/xhtml">
<head>
<meta name="viewport" content="width=device-width, initial-scale=1.0, maximum-scale=1">
</head>
<body>
<div><p>Here is a div with some text. How long is this text? It should wrap around to the next line since it is a long enough line</p></div>
<script xmlns="http://www.w3.org/1999/xhtml"
src="http://<server>:<port>/frevvo/web/tn/frevvo.com/u/8aa27da6-4bef-427c-92e3-6ad8d58e506a/app/_bDd4YX76EduXFsA4l9RQeQ/formtype/_RwO0sMxjEeKp6swhthjzZQ/embed?container=false&center=false&resize=true&border=false"
type="text/javascript">
</script>
</body>
</html>
Unsaved Changes Warning Message
Data loss is possible if users filling in a lot of data in a long forms/workflows close the browser ot tab without saving or submitting. If the Unsaved Changes Warning feature is configured, users will be warned of this situation before the data loss. This applies to use-mode forms and workflows only, not edit mode. The warning only shows if there have been changes made to the form/workflow. If there are no changes, then no warning is displayed. If the form/workflow is Saved or the Save on Navigate feature is configured for a workflow, then changes are saved and the warning is not produced on any attempt to close the browser.
The unsaved changes warning feature is not supported on iOS Safari and only partially supported on Chrome Android. You may notice some inconsistencies with workflows. Refer to the Unsaved Changes topic for the details.
This feature is not configured in the frevvo Cloud. In-house customers can turn on the Unsaved Changes Warning feature with the frevvo.unsaved.warning property.
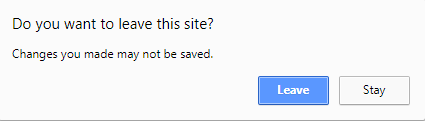
The warning behavior message is browser specific. The messages for Firefox, Chrome and Microsoft Edge are shown below:
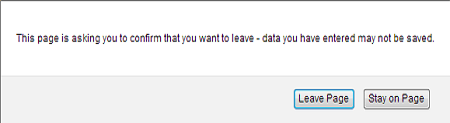
Firefox browser
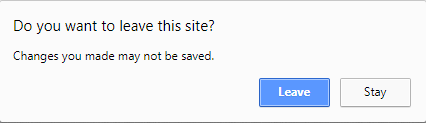
Google browser
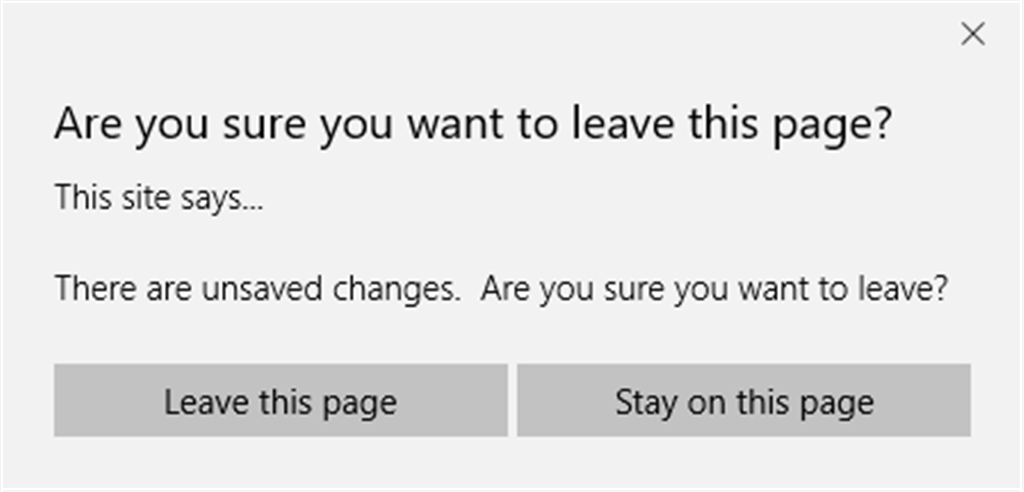
Microsoft Edge browser
Unsaved Data Message and Workflows
Certain browsers (chrome and firefox, but not IE11 and Edge) will not show the Unsaved Data message on closing the browser window/tab if the user does not click on something.
The Unsaved Changes feature may not work reliably with workflows in the following scenarios:
- A user makes a change on step 1 of a screenflow, selects continue but makes no change at all on step 2. They then immediately close the window. No prompt is displayed.
The Unsaved Data Warning will appear when performing a task from the Task List. For example,if you change some data and then click the Inbox icon
Turn on/off the Unsaved Changes feature for a form or workflow instance
To turn off the unsaved warning feature for a particular form/workflow instance, add the _unsavedWarning=true/false URL parameter to the Share URL. Remember to add the ? at the end of the URL if this is the first URL parameter you are adding and the & at the end of the URL if there are other URL parameters already appended to the URL.
Designers may want to do this when developing/testing forms/workflow.
https://test-app.frevvo.com:443/frevvo/web/tn/mycompany/u/e5a0e839-1026-4bcf-92a0-5c8e4db9685e/app/_Sf71cMoREeeSeKphUs96Bw/formtype/_DPvGUNm-EeeN8JH6jZk5_Q/popupform?_unsavedWarning=false
https://test-app.frevvo.com:443/frevvo/web/tn/mycompany/u/e5a0e839-1026-4bcf-92a0-5c8e4db9685e/app/_Sf71cMoREeeSeKphUs96Bw/formtype/_DPvGUNm-EeeN8JH6jZk5_Q?_method=post&embed=true&unsavedWarning=false
See URL Parameters for more information.
Unsaved Changes Warning Message Configuration Property
In-house customers can turn on the Unsaved Data feature by adding the the frevvo.unsaved.warning property to the frevvo-config.properties file. Appending the _unsavedWarning URL parameter to a form/workflow overrides the value set in this configuration property.