This documentation is for Live Forms 9.1. v9.1 is a Cloud Only release. Not for you? Earlier documentation is available too.
COVID-19 Response Info: At frevvo, our top priorities have always been employees and customers. We have taken several steps to promote the well-being of our people, to minimize services disruptions, and to help where we can. Visit our website for updates.
Printing Forms
Print View
By selecting a form's printable checkbox a print icon will be displayed at the top of your form. When the form is used and the printer icon is clicked the form is rendered in a new browser tab and a pdf document is generated and downloaded depending on your browser settings. The name of the pdf file will be <form name>.pdf unless the form was designed to name the pdf something different. The form pdf file can then be printed. Only PDFs are supported.
Workflows do not currently support this print feature. See Printing Workflows for other options.
All controls also have a printable property. A control's Printable property is checked by default. If you un-check this property then the control will not appear in the pdf. This property can also be set dynamically via a business rule by setting <control>.printable = [true|false].
There are a few differences between the browser view and the print view. For instance, decorators and placeholders do not appear in the pdf document; collapsed sections will appear expanded; and tabs will be rendered one tab under another.
Print Styles, (font, orientation, margins and header/footer content) for PDFs generated as part of a submission can be selected by the designer.
If you are trying to make the print view of a table control consistent with the browser view, set the column widths explicitly at either the column cell level or at the table level.
Use the PDF generation feature if you need a "Pixel Perfect" representation of your form.
On This Page:
Submission Document
Form submissions can be converted to PDF, TIFF, PNG, and JPEG documents. However ' submission repository only saves PDFs. While all formats are supported when submissions are sent as an attachment to a submission email, or as an attachment to a POST to a back-end system such as a document management system.
The Form and Doc Action Wizards for email and post submission control whether or not the form is converted to a PDF document or other image types such as TIFF, PNG, JPEG, and attached to the submission. You can control which form fields are added to the document via the printable property on each field in your form.
Page Breaks
Page breaks can be added to the print view by adding the special f-page-break to any control's CSS Class property. Any control with f-page-break will start at the top of new page. In the example below, the Room Information tab prints on a new page.
Do not use the f-page-break css class in table cells.
Controls can be prevented from having a page break in the middle of the control. For example, you may not want a checkbox control split with some options printed on one page and the rest of the options on the next page. In this case, place the checkbox control inside a group control (such as a section or a panel) and apply the CSS Class property f-page-break-inside-avoid to the group control. If the control would have had a page break inside the control, this property will cause the entire control to print on the next page. If you have nested group controls, the outer group control f-page-break-inside-avoid CSS Class property takes precedence.
International Characters for PDFs
in-house supports international characters. This applies to any designer entered text that is part of the form design such as form control labels as well all the data entered into the form by the user. This is incorporated in the following areas:
- PDFs generated in the
submission repository when you check Save PDF on your form
- PDFs generated for print view
- PDFs generated for mapped PDFs
Contact customer support if you are a Live Forms Online customer. The instructions below only apply to in-house.
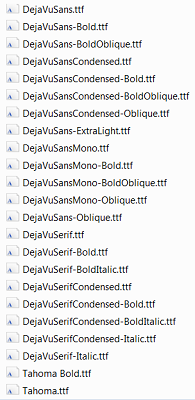
It is important to ensure the correct font-family is in place so Internationalization (i18n) fonts will be used when PDFs are generated. Due to the cost associated with font set distribution, a small default set of fonts are provided. The list of default fonts is shown in the image:
These fonts are NOT intended as internationalization fonts, although they do cover some international characters. The DejaVu font family contains Sans fonts which are a very close match for Arial and it contains the Serif fonts which are a near match for Times Roman. The Sans Mono font is a monospace (fixed width) font.
customers who need international fonts must purchase and install their own font file. A Unicode font with broad language support is recommended.
Installing the Character Set
The font set that you are going to use must be available to at PDF rendering time. This is accomplished by placing the fonts in the /WEB-INF/fonts folder after expanding the frevvo.war.
Follow these steps:
- Stop the
server
- Uncompress/expand the <frevvo-home>/tomcat/webapps/frevvo.war file to a temporary location on your desktop.
- Add your font file (unifont.tff file is an example) to the WEB-INF/fonts directory.
- Re-WAR to create a new updated frevvo.war file.
- Replace the original frevvo.war file with the new updated frevvo.war file, typically located in this directory: <frevvo-home>/tomcat/webapps.
- Re-start your
server.
- Select the Print Font for PDFs in the Forms Designer as discussed below.
Select the Print Font
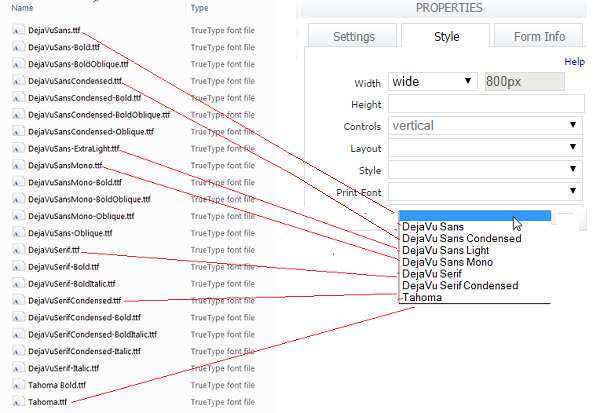
The designer Print Font property on the Form Style tab enables you to select your pdf print font. The selections that appear in the Print Font dropdown menu come from the fonts loaded in the WEB-INF/fonts folder. If no print font is selected, then the default rendering will be used.
If you install in-house and expand the frevvo.war as described above, you will see the default fonts WEB-INF/fonts directory. Notice that the dropdown however only shows eight font choices. This is because the dropdown lists the font families and not the individual font names. For Example, the DejaVu Sans font family includes DejaVuSans-Bold and DejaVu-BoldOblique fonts.
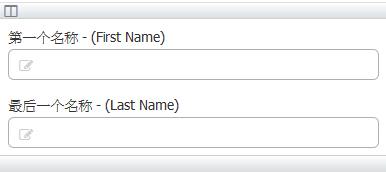
Now that you've added your font to the WEB-INF/fonts directory and selected it in the Print Font dropdown your PDFs will render using that font. Let's take a look at an example. Imagine you have a form with First and Last name fields where you have entered Chinese Characters for the labels: You want to print the Chinese characters in PDFs associated with this form.
You select one of the default fonts, (Tahoma), from the Print Font dropdown then you click the print icon. Notice the PDF does not show the Chinese characters:
You determine that characters in the label are not supported by any of the the default fonts provided by . As the designer, you locate a font family named unifont.tff that you believe will show the Chinese characters. You follow the steps above to install your unifont.tff file to the WEB-INF/fonts directory. You rezip the war file and restart
. Select unifont from the Print Font dropdown and click your form's print icon to see the Chinese characters printed correctly.
All PDFs saved to the submissions repository and all generated mapped PDFs will show international characters also.
Matching form and PDF fonts
Let's say you chose an Arial font for your form. You must create a style that has Arial selected for the font.
Apply the style to your form by selecting it from the Style dropdown on the Style tab on the Form Properties Wizard.
The default PDF print font is not a match for an html Arial font. Select DejaVuSans from the Print Font property and the PDFs will now have a very close approximation to the Arial font. If you want the PDFs to be printed using a true Arial font, then you must purchase the correct font, install it, and select it from the Print Font property. Once you have the Arial font set you want to use, follow the steps for Installing the Character Set to add it to . Finally select your new font. The example shown below is for a font file called arialuni.ttf. Your font family name may be different.
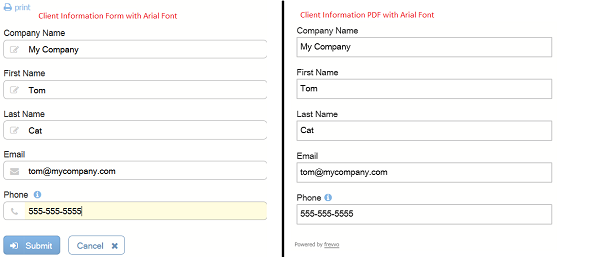
Here is an example of a Client Information Form and PDF using an installed Arial Font:
Custom Print Button
All forms automatically have a print icon at the top of the form. You can hide the print button by deselecting the forms' printable property in the form designer. If you need to add a print button anywhere other than at the top of the form, you can do so by following these steps:
- Add a message control to your form
Add the following HTML to your message control
<center> <a href="#" onclick="_frevvo.api.forms.printer.printFlowStep(this);">Print PDF</a> <center> </center> </center>
If you were using the onclick call to _frevvo.api.printFlowStep(this), this has been deprecated. Please replace this as shown in the sample above with the onclick call to _frevvo.api.forms.printer.printFlowStep(this);
The same technique above can also be used for workflows. In the case of a workflow the custom print button will print the currently visible workflow step and not the combination of all the steps in the workflow. The current activity will print even if the activity's print property is unchecked.


