Live Forms v7.4 is no longer supported. Please visit Live Forms Latest for our current Cloud Release. Earlier documentation is available too.
Leave Approval Workflow Tutorial
- Former user (Deleted)
On This Page:
What are we going to build?
A common example of a workflow is a Leave Approval , where an Employee requests vacation and the Manager must either approve it, reject it or send it back to the Employee for corrections. Typically, the process is paper or email-based. The Employee fills out a paper form and hands it to the Manager for a signature. The form is then faxed or delivered to HR where it is saved in a folder or scanned into the HR or document management system.
Using Live Forms, you can automate this workflow so that it is completely electronic and paperless. Further, you can integrate the workflow with Google Apps, a document management system such as Digitech ImageSilo/PVE, your database or custom business system so that the leave approvals are stored online.
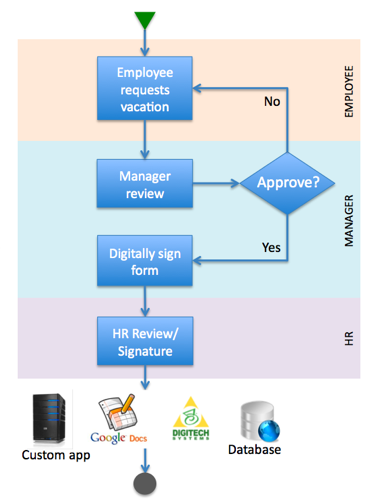
The steps are as shown in the figure:
- The Employee goes to a web page that embeds the workflow. Live Forms makes this very easy to do.
- The form is configured so that the Employee only sees the relevant portion of the form, i.e. the Employee does not see the Manager approval section or the HR Review section. The Employee information and Manager id are automatically populated by
.
- The Employee fills in the form, digitally signs it and clicks a Submit Request button.
- When the Manager logs in, she visits a web page that displays an electronic task list.
- All pending leave approval requests will be displayed in the task list.
- The Manager clicks to perform an approval. The Manager-specific portions of the form are now visible. The data entered by the Employee is automatically populated for the Manager to review.
- If the Manager requires corrections, she can send the form back to the Employee to make changes.
- Once she approves, she digitally signs the form and clicks Submit Request.
- In the final step, the workflow is sent to the HR department to update records and/or comments.
- The form data along with a PDF image can be electronically saved in a back end system such as Google Drive, ImageSilo/PVE, your HR system etc. The data will also optionally be saved in
- Finally, the original requesting Employee is notified by email.
Setup users and roles
This is a one-time setup that will have to be performed by an administrator.
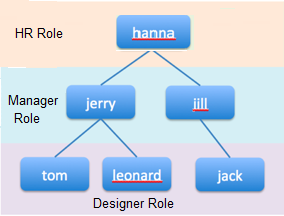
In our example, the company org chart is as shown above.
We will need to create two roles, Manager and HR. To create these roles in :
- Login to
- On the page that is displayed, click the 'Manage Roles' link.
- Click the
 icon and in the form that is displayed type in the desired role. Note that role names are case sensitive.
 - Repeat for the second role.
The admin user will also need to follow the steps below to setup the users shown in the org chart.
If you are using LDAP or Active Directory, you can use the hierarchy from that server.
- Login to
- On the page that is displayed, click the 'Manage Users' link.
- In the Alphabet at the top click All to display a list of the users in the tenant. If the users shown in the company org chart above are not listed, perform steps 4 - 8 to add them.
- For each user, click the
 icon to add a new user profile.
 - In the form that's displayed, fill in the information for each user shown in the company org chart shown above.
- Be sure to select the role specified in the company org chart for each user.
- Select the user's Manager from the Reports To drop down. For example, Jerry is the manager for Tom and Leonard and Jill is the manager for Jack. Jill and Jerry report to Hanna.
- Click "Submit" to add the user.
- If you are using Active Directory or LDAP, you do not need to do this.
Create the Leave Approval form
- Logon to your tenant as a designer user.
- Click the New icon to add a new application.
- Click the
 Properties icon. Change the name of the application to My Company HR. Click Update.
 - Click the
 Edit icon for the My Company HR application.
 - Click the New icon to create the Leave Approval form.
he New Form wizard displays listing any forms that have been published as templates. SInce there are none listed, click Finish to accept the Blank template for your form..
Change the name of the form to Leave Approval Form on the form Properties pane.
Create the Leave Approval form with the four sections described below.
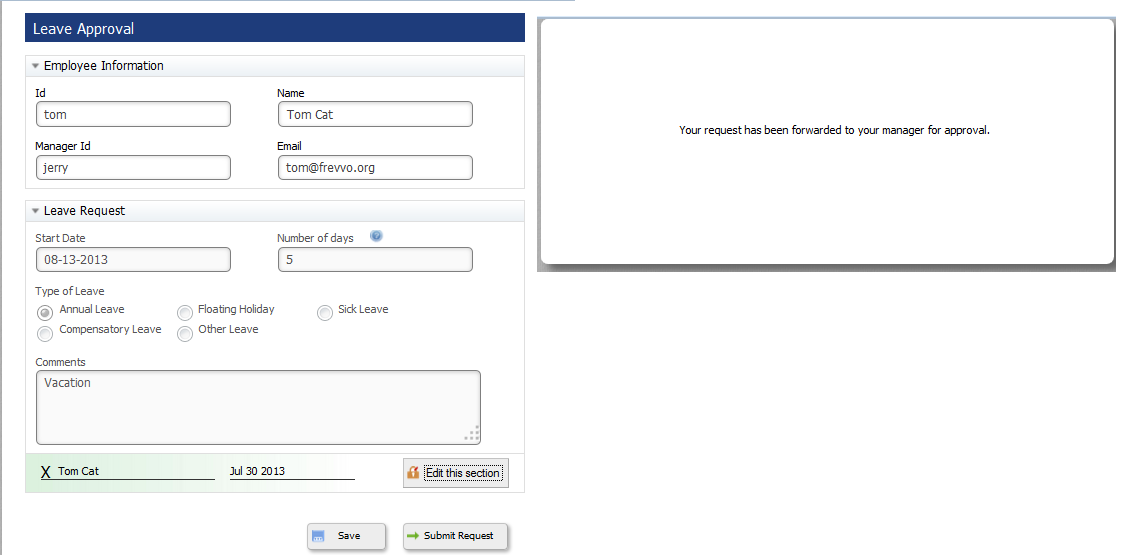
Employee Information Section
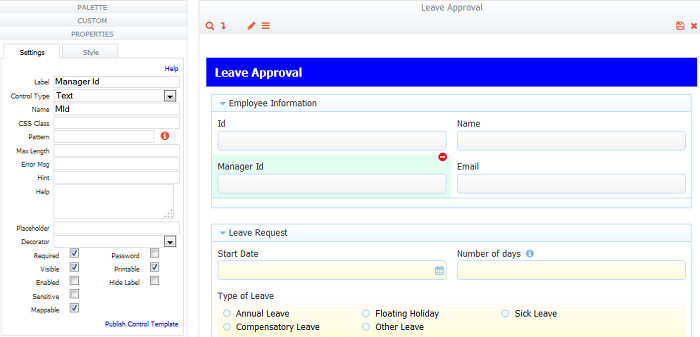
- Drag and drop controls as shown in the image above.
- We have created a section with Employee information containing controls Id, Manager Id, Name, and Email.
- Make sure that the Name field of each control is properly set. This is a critical step to ensure that business rules work. The controls are named as shown in the table below. Make sure that the Control Name field is exactly as shown below including case-sensitivity. You may label the controls whatever you want.
- Uncheck the Enabled checkbox for each control and check the Required checkbox. The control values will be automatically filled in by a business rule.
| Control Label | Control Name | Description |
|---|---|---|
| Id | Eld | The login id of the currently logged in Employee (user) |
| Manager Id | MId | The login id of the current user's Manager |
| Name | EFullName | The current user's full name |
| EEmail | The current user's email address |
Leave Request Section
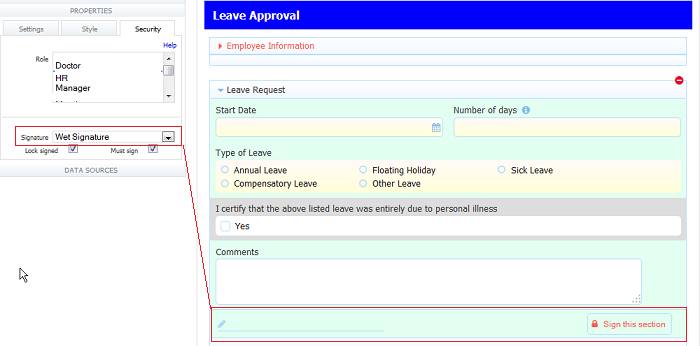
This section is filled in by the Employee who is requesting the leave.
- Drag and drop controls as shown in the image.
- We've placed Start Date, Number of Days, Type of Leave, Certification and Comments controls as shown.
- Select the Leave Request section by clicking on its header.
- In the properties panel, select the Security Tab.
- This is considered a Signed Section. Two types of signatures are available from the Signature drop down: Text/Signature Image or Wet Signature. Here is information about the difference between the signature types. Select Wet Signature from the dropdown.
- Check the Must Sign checkbox to require the signature and verify that the Lock checkbox is checked to prevent tampering with the signed data .
- Notice that a "Sign this section" button and an
 icon and a line appear at the bottom right and left of the section when the signature type is selected.
 - The Employee will have to sign the section before it can be submitted.
- Do not forget to uncheck the Visible checkbox on the Certification field. This field is not visible on the form unless the Employee selects Sick Leave as the Type of Leave. This will be handled by a rule that will be discussed later in the tutorial.
Manager Approval Section
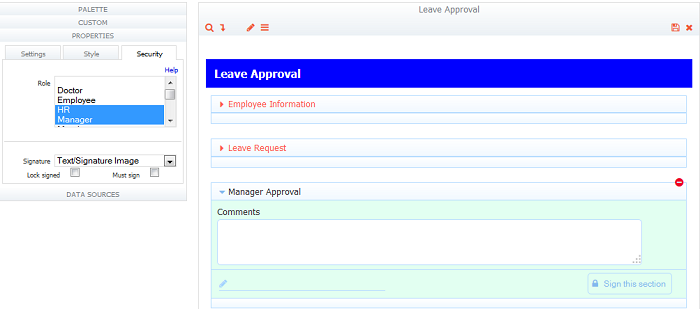
This section is used by the Manager to approve or deny the leave request. We will set up the Quick View feature so that the Manager will have a quick way to approve or reject the task from their Task List when we create the Leave Approval workflow. This is convenient particularly if this part of the workflow is performed on a mobile device. An Approval control is required for this feature. An Approval control is a section that contains only one textarea control and can be optionally set up for a digital signature. Follow these steps to create the Approval control so we can incorporate the Quick View feature when we create the Leave Approval workflow:
- Drag and drop a Section control. Name the section Manager Approval.
- Add a text area control with 3 lines and name the control Comments.
- Select the section by clicking on its header.
- In the properties panel, select the Security Tab.
- In the Roles multi-select, select the roles Manager and HR by holding down the Control key and clicking. This section will only be visible to the Manager and to the subsequent HR reviewer.
- Select Text/Signature Image from the signature dropdown. As before, check the Must Sign checkbox to require a signature and verify that the Lock checkbox is checked to prevent tampering with the signed data .
HR Review Section
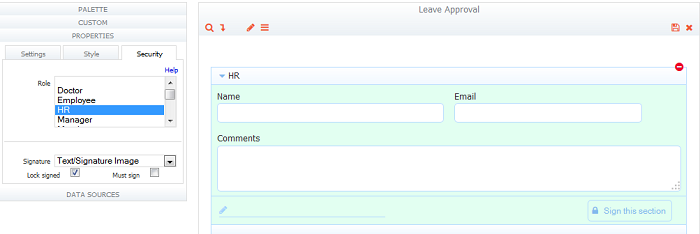
This section is for the HR reviewer and is similar to the Manager approval section.
- Drag and drop a Section control. Name the section HR.
- Drag and drop text controls for HR name and email. We've labeled the controls Name and Email but the Name property of the control contains HFullName and HEmail. Once again, the form will fill in this control automatically. We'll use the value from this control to create a meaningful audit trail for the workflow.
- We've also added an optional Comments field.
- As before, in the Security Tab, select the HR role to restrict viewing of this section to HR Employees.
- Select Text/Signature Image from the Signature dropdown and check the Must Sign checkbox to make the signature required.
Business Rules
Click on the  rules icon in the toolbar to create a rule to initialize the form and a second one to make the Certification control visible when Sick Leave is selected as the Type of Leave. The Rule Validator can help troubleshoot any issues with rules.
Your form will contain two business rules: the first one automatically initializes various fields in the form and hides irrelevant sections. This rule is shown below:
- We first get the name of the current step (step).
- If the step name is Employee and the Employee ID is blank, we'll initialize several fields as shown below. If the Employee ID already contains a value (e.g. if the Manager sends it back to the Employee for corrections), we do not wish to overwrite the data.
- If the step name is Employee, we also want to hide the Manager Approval and HR sections. This will happen automatically if the user does not have the Manager role but remember that Managers are also Employees and might request leave that must be approved by their supervisor.
- The rule also contains initializations to be performed in the Manager and HR steps of the workflow.
It is very important to ensure that the Names of the controls in the form exactly match the names used in the rule below and that the names used in a rule are unique across the form.
Here is an example of a rule that will satisfy the four requirements listed above:
if (form.load) {
    var an = _data.getParameter("flow.step.name");
    if (an === 'Employee') {
        EId.value = _data.getParameter('subject.id'); // Username
        EFullName.value = SubjectUtil.getFullName(_data.getParameter('subject.first.name'), _data.getParameter('subject.last.name'));
        EEmail.value = _data.getParameter('subject.email');
        MId.value = _data.getParameter('subject.reports.to');
    } else if (an === 'HR') {
        HFullName.value = SubjectUtil.getFullName(_data.getParameter('subject.first.name'), _data.getParameter('subject.last.name'));
        HEmail.value = _data.getParameter('subject.email');
    }
}
Add a second rule to make the Certification field visible when Sick Leave is selected as the Type of Leave:
if (TypeOfLeave.value === 'Sick') {
  Certification.visible = true;
  Certification.required = true;
} else {
  Certification.visible = false;
  Certification.required = false;
}
When you are satisfied with the rules, click the Finish button to save the Rules and then again to save the updates to the flow and return to the Flow Designer. We're now done with the form.
Creating the Leave Approval Workflow
Read the general documentation on designing flows for a detailed discussion of workflows and their features
Setup the steps in your workflow
- Create a new flow by clicking on the Flows menu item and clicking the New button.
- Drag and drop the Leave Approval form you just created into the flow. This creates a step (step) in the workflow.
- Name the step 'Employee' by typing the name in the Name property.
- In our example, we will use the same form three times, once for the Employee, Manager and HR.
- Select the Employee step and click the
 icon twice.
 - This will create two linked steps. A linked step refers to the same form as the original step. The form cannot be edited from a linked step but any edits made to the original form are reflected in the linked steps.
- Name the second step Manager and the third step HR.
Setup roles/users for steps
- Click the Employee step. Do not select a role for this step.
- Click the Manager step and in the User property type in the string {MId}. Remember that the control in the form for the Manager Id was named {MId}. When the workflow runs,
- For the HR step, select the HR role.
Set flow properties
- Click the toolbar at the top of the flow.
- Check the Save PDF box to generate and save a PDF in the repository.
- In the Navigation drop down select the type of navigation toolbar you want
- Click the
 icon and set the visibility to Public in Tenant.
 - Verify that the Deployment is set to Production.
[Optional] Set button labels
By default, the flow buttons are labeled Continue but you can customize these labels.
- Click the Employee Step and in the Continue Label property type the desired label e.g. Submit Request.
- Click the Manager Step and in the Continue Label property type the desired label e.g. Send to HR.
[Optional] Set pending message
When a workflow step must be performed by someone else e.g. the Manager, a default message is displayed on the screen. In most cases, you will want to customize this message.
- Click the Manager Step and in the Pending Msg property type the desired message e.g. Your request has been forwarded to your Manager for approval. Note that the property is set on the Manager step and will be displayed when the Employee from the prior step clicks the Submit Request button.
- Similarly, click the HR Step and set the Pending Msg that will be displayed to the Manager.
If you prefer, you can click the toolbar at the top of the Flow Designer and set the Pending Msg property for the flow as a whole. This will be used if there is no step-specific Pending Msg.
[Optional] Set history message
Every workflow has an audit trail built-in. When a workflow step is either manually saved by the user or is placed in the pending state for a different user, you can customize a message that is saved in the audit trail. This is extremely useful when viewing the status of a workflow.
- Click the Employee Step and in the History Msg property type the desired message e.g. {EFullName} requested leave starting {StartDate} for {NumberOfDays} days. At runtime,
- Click the Manager Step and in the History Msg property type the desired message e.g. Manager: Signed by {MId}.
- Similarly, for the HR Step, set the History Msg to HR: Signed by {HFullName}.
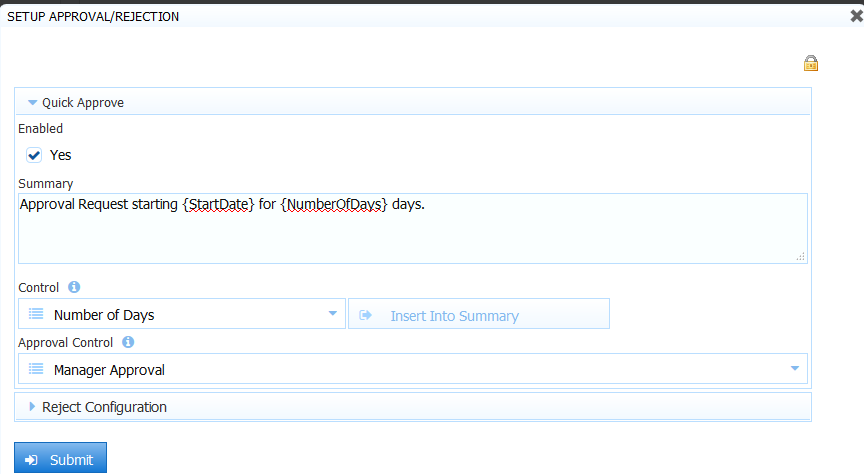
[Optional] Setup Quick View
The Manager can quickly accept/reject tasks by clicking the  Quick View icon for a task when accessing the Task List. Set up this feature for the Manager Approval step in this flow. Click on the Manager step and then click the Setup/Approval/Rejection link on the Property pane. Be sure to check the Enable box and then compose a Summery of the task that will be seen on the Manager's Task List. You can select controls in your flow from the Control dropdown and then click the Insert into Summary button to add these fields as templates. The Approval Control dropdown will provide a list of all the sections in your form that meet the Approval Control criteria. Refer to this documentation for more information on this feature.
[Optional] Customize notification emails
When a workflow step must be performed by someone else e.g. the Manager, a notification email is sent. The notification email can be turned off by each user in his/her profile. The content of the email can be customized for each step in the workflow.
- Click the Manager Step and click the Setup Task Notification Email link. In the wizard that appears, you can set the Subject and Message for the email.
- For example, in the Subject field, enter ''Leave approval for {EFullName}''. You can use the drop downs at right to select the desired controls.
- In the Message field, enter ''{EFullName} has requested {NumberOfDays} days leave starting {StartDate}. To approve or deny this request, please click this link: {task.list.url}." Note the special template {task.list.url}. This generates a link that can be clicked to directly access a user's task list.
- You may setup the Task Notification Email for the HR step in a similar fashion.
[Optional] Setup Task Info
When a workflow step must be performed by someone else e.g. the Manager, a task is generated and placed on one or more users' task lists. You can customize the name of the task that is displayed either for each step individually or for the flow as a whole.
- Click the toolbar at the top of the flow.
- In the Task Info property, type Leave Approval for {EFullName}. As before, the control names must be exact.
When you are done, click Finish to complete the workflow.
Connecting the workflow to Google Drive
Skip this step and go to Connecting to ImageSilo/PVE if you do not want to save your submissions to Google drive. If you want to connect your flow to a directory in your Google drive you must install the google connector if you are an in-house customer. You must also obtain an access token for your Google account.
We'll setup the workflow so that the Leave Approval documents - a PDF and other data - will be stored in your online Google Drive account.
Create a Folder
The first step is to sign into your Google Account and create a folder. All leave approval documents will be stored in this parent folder. We'll create a folder called Leave Approvals. More information about the Google Connector can be found here.
Use the Google Documents wizard
- Click the
 what happens to my data icon in the toolbar at the top of the form.
 - In the wizard that pops up, select the Save to Google Documents button.
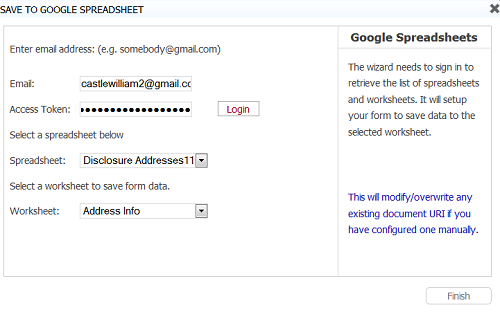
- Enter your Google account user id and the access token for that account as the password.
- After your login has succeeded, the wizard will show the list of Folders available.
- Select the folder you created earlier (Leave Approvals).
- Choose a name for the Submission Folder. This name should be unique for each submission. The best approach is to choose a combination of controls in the form that will generate a unique name. In our case, we have chosen the name: {EFullName}_{StartDate}. As you remember, there are controls in the form EFullName for the Employee's full name and StartDate for the start date of the leave. Combining the values of these controls creates a unique name.
- Click the Finish button. Save the flow.
- Your workflow is now configured to save submissions to your Google Drive account.
Do not use spaces or special characters when creating submission folder names.
Connecting the workflow to Digitech ImageSilo/PVE
Skip this step and go to Setup Additional Email if you are not using Digitech ImageSilo/PVE.
We'll setup the workflow so that a Leave Approval PDF document is stored in your online ImageSilo/PVE project.
This tutorial assumes you have already copied the pve.war file from <frevvo-home>/ext/connectors to c:\frevvo\tomcat\webapps.
Create a Project
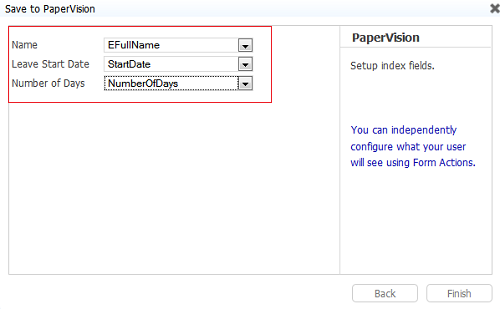
The first step is to create a Project in ImageSilo/PVE. All leave approval documents will be stored in this project. We've created a project called Leave Approvals and setup index fields Name, Leave Start Date, and Number of Days.
Use the ImageSilo/PVE wizard
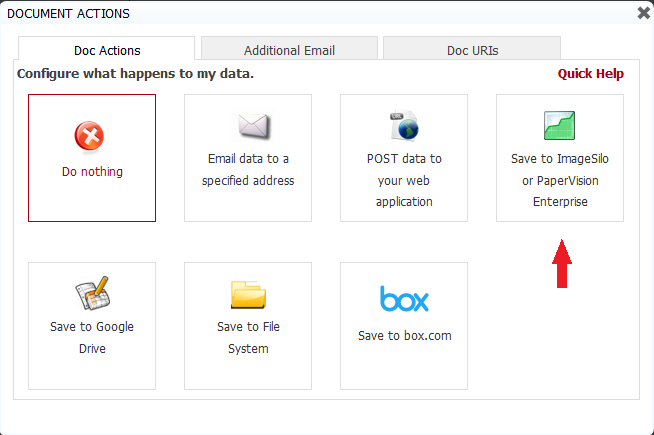
- Click the what happens to my data icon in the toolbar at the top of the form.
- In the wizard that pops up, select the Save to ImageSilo or PaperVision Enterprise button.
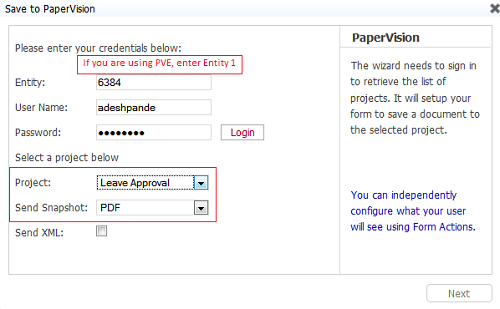
- Enter your login credentials.
- After your login has succeeded, the wizard will show the list of Projects available.
- Select the project you created earlier (Leave Approvals).
- Select the items you would like to include in the submission:
- To include the image type of the filled in form, select PDF, PNG or JPG from the Send Snapshot dropdown. PDF is the default option. Select the blank option from the dropdown to exclude this attachment in the submission.
- Check the XML checkbox if you want to store the xml data document in addition to the form image document
- Attachments uploaded to your form/flow are included if the Files checkbox is checked. This checkbox is checked by default. Uncheck it to exclude attachments in the submission.
- Attachments uploaded to your form/flow are included if the Send Files checkbox is checked. This checkbox is checked by default. Uncheck it to exclude attachments in the submission.
Check None for the Send Gen Forms control since we have not generated any Pixel Perfect PDFs for this workflow.
- Click the Next button.
- On the next screen, the index fields from the project are displayed.
- For each index field, you may select a form field to map it to. At runtime, the index fields will be populated from the values in the form.
- Your workflow is now configured to save your document to ImageSilo/PVE.
[Optional] Setup Doc Action Email
In most cases, you want to notify the original Employee that requested the leave was approved in addition to storing the data..
- Click the what happens to my data icon in the toolbar at the top of the form.
- In the wizard that pops up, click the Email data to a specified address tab.
- Click the Email data to a specified address button.
- In the To: field, enter a template using the drop down to the right. Select the Employee's email address via the control EEmail. The To: field should look like {EEmail}.
- In the Send Snapshot drop down, select PDF.
- Uncheck the XML and Files checkboxes.
Check None for the Send Gen Forms control since we have not generated any Pixel Perfect PDFs for this workflow.
- Click Next.
- In the Subject: field enter Leave approval for {StartDate}. Once again, you can use the drop down at right to select controls.
- In the Message: field you can enter anything you want including dynamic content using the drop down at right. For example, Your leave approval request was successfully processed by {HFullName}. This field can also contain HTML for rich content.
[Optional] Setup a Form Action
You can setup any form action that you choose. For example, to display a message:
- Click the
 Form Action icon in the toolbar at the top of the form.
 - Select the Display message when users submit your form button.
- Enter a message.
- The message can be dynamic. For example, Leave approval successfully processed for: {EFullName}.
- At run time,
- Save the changes to your workflow.
Testing the Workflow
- On the Flows Home page, click the Test button for your workflow.
- Fill in the Start Date and Number of days. Select Sick Leave for the type of leave to see if the hidden certification field displays. Check another type of leave to verify that the Sick Leave Certification field is again hidden.
- Enter a comment, Sign the form and click the 'Submit Request' button.
- Since the second step in the flow was assigned to the user identified by the {MId} field,
- Finally,
- Logout as the designer user.
Task List
Read the task list documentation for a detailed discussion of task lists and their features.
includes a built-in Task List for every user. This task list displays all pending tasks, (in our example, pending leave approval requests) for the user. To access the task list:
- Check the email account assigned to the Manager that your designer user that filled out the request reports to. You should see an email with the title Leave Approval for (your designer user name). Click on the link in the email and log in as either Jack or Jill to perform the manager step.
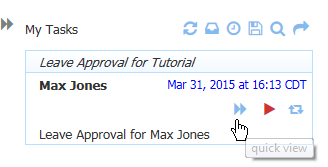
- You should see a Task List similar to the Figure above.
- Click the icon to open the Quick View of the task that we set up earlier. Jerry or Jill, both Managers, can comment, then quickly accept or reject the request. The Quick View feature makes it very easy for the managers to perform this step of the flow from a mobile device (iPad or iPhone). Refer to the Employee On Boarding Tutorial for another example of a workflow that uses the Quick View feature.
- If you choose to forego the Quick View, the appropriate sections of the Leave Approval request form (the Manager Approval section, in this case) can be viewed by clicking the detail button. The same display can be seen by clicking on the perform this task icon
 instead of the Quick View icon.
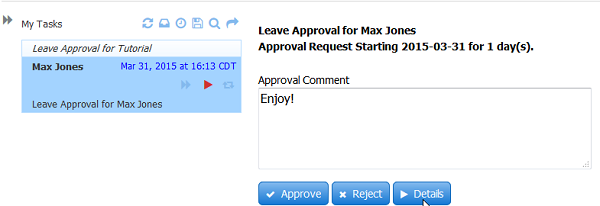
- Notice that the Task List displays the message you entered in the Summary field in the Quick View wizard along with the task information. If you left the Summary field blank, whatever was entered into the Task Info field for this step in the flow will display.
- You can view an audit trail or modify the task by clicking the appropriate icon.
Approve the task via the Quick View screen by clicking on the Approve button. A "Task sucessfully approved" message will display.You can run the workflow a second time to verify what happens if you reject it.
![]()
If you chose not to use the Quick View, click the
perform this task icon. Jerry or Jill, both Managers, review the information, fill out the fields in the Manager Approval section and click the '"Sign this section" button to digitally sign the form.- Click Send to HR to send the request to HR for approval.
- Logout as the Manager.
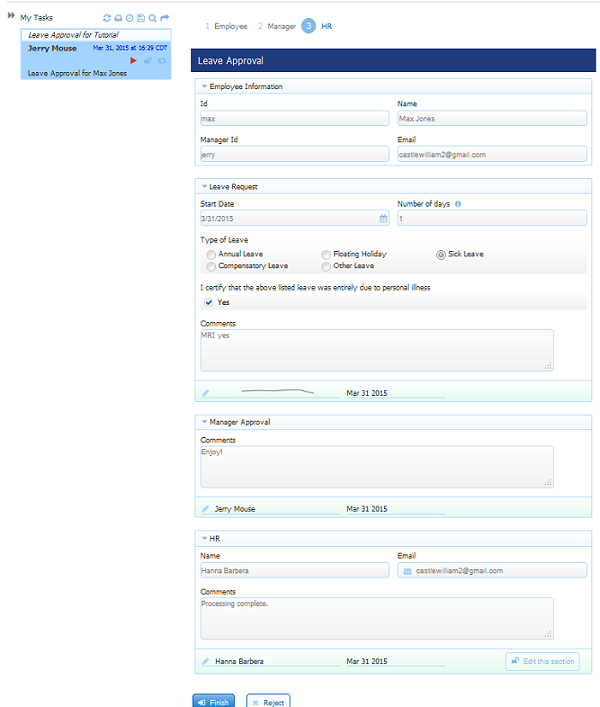
- Check the email account assigned to the user with the HR role (Hanna) and click on the link in the notification email. Login as Hanna.The Quick View feature is not configured for this step of the flow so only the Manager Approval and HR sections of the Leave Approval request form will display based on the roles assigned earlier.
Click the
 icon to view the Audit trail for the flow. The audit trail contains information for steps performed by the designer and the manager visible at a glance assuming you setup the History Msg as described above. If you did not setup the History Msg, you will not see it in the Audit Trail, Hanna reviews the information and fills out any required fields, then clicks the 'Sign this section' button to digitally sign the form.
- Click the Finish button to complete the workflow.
The Form and Doc actions will now be performed: you will see the display message that you configured, a PDF will be saved to your Google Drive or to ImageSilo/PVE as configured and an email will be generated and sent to the original requester with the pdf attached.
Sharing/Embedding the Workflow
The workflow can be easily shared or embedded in your web site. There are many flexible options for doing so. You can find instructions in the tutorial on embedding forms and workflows.