Live Forms v7.4 is no longer supported. Please visit Live Forms Latest for our current Cloud Release. Earlier documentation is available too.
Expense Report Workflow Tutorial
- Former user (Deleted)
This tutorial will show how easy it is to create an Approval Workflow using . We will use an Expense Report workflow as an example. Consider this business scenario:
- The employee accesses the Expense Report workflow and fills in the form, signs it and clicks Continue.
sends that employee’s manager a notification.
- The manager clicks on the notification [on any device], can view the expense report request and approve it or send it back for corrections.
- If approved by the manager and the total amount of the expense report is greater than $1000.00, the workflow will be routed to the VP for further approval otherwise it will continue to employees in HR for final processing.
Final processing might include integration with a database or with a back end system.

On This Page:
What You will need:
- The Approval Forms/Workflow application which contains a precreated Expense Report workflow. This workflow will be completed and functional by the end of this tutorial.
- A
Setup Users and Roles
We will need three roles to create and test the flow: Reviewer, Supervisor and Accounting. To create these roles in :
- Login to
- On the page that is displayed, click the Manage Roles link.
- Click the
 icon and in the form that is displayed type Reviewer. Click Submit. Note that role names are case sensitive.
 - Repeat for the Supervisor and Accounting third roles.
- Click the "Back to Manage Tenant" link at the top of the page.
The tenant admin will also need to setup a designer user to create and test the flow. We also need three additional users: a user with the Reviewer role, a user with the Supervisor role and a user with the Accounting role.
Click the Manage Users link.
- In the Alphabet at the top click All to display a list of the users in the tenant. Follow steps 4 - 7 to create four users:
- For each user, click the
 icon to add a new user profile.
 - In the form that's displayed, fill in the information for each user.
- Assign the frevvo. designer role for one user, the Reviewer role for the next user, the Supervisor role for the third user and the Accounting role for the last user.
- Select the user's Reviewer from the Reports To drop down for the designer user. Make sure you select the user id for your user with the Reviewer role.
Click "Submit" to add the user.
Step 1: Download/Upload the Approval Forms/Workflow Application
Download the partially created Expense Report flow to somewhere on your hard drive.
Login to
Click the Upload button on the Application Home page. Browse to the location of the Approval Forms/Workflow application on your hard drive. Click Upload.
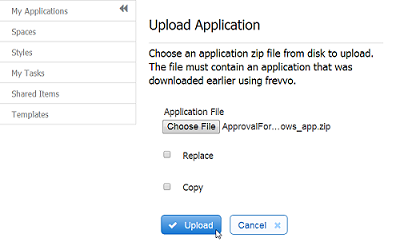
The Approval Forms/workflow application will be added to the Application home page.
Step 2: Create the Workflow
In this step, we will create the Expense Report workflow.
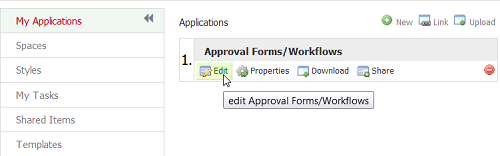
Click the Edit button for the Approval Forms/Workflows application on the Application Home page.
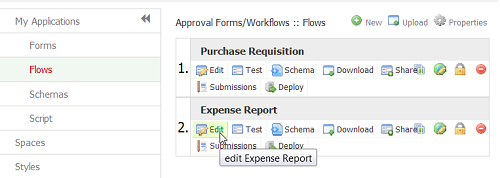
Click the Flows tab and then click Edit for the Expense Report flow:
At this time, the Expense Report flow only contains the form named Expenses. The Expense report form was created using simple visual drag & drop and edited to achieve the desired layout. To view the form, click the
 icon on the flow designer toolbar.
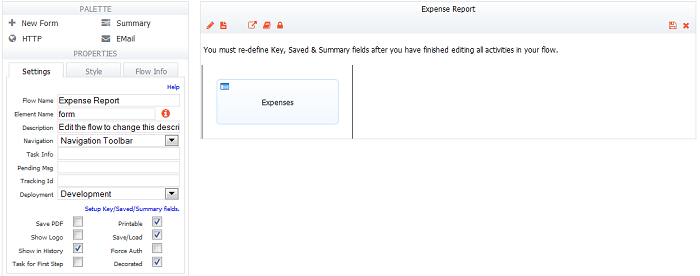
There are sections in this form for the Reviewer, Supervisor and Accounting approvals. A business rule controls when these sections are shown/hidden as the flow progresses. For Example, when the employee is filling out the Expense Report, the Reviewer, Supervisor and Accounting sections are hidden.
The simple business rule shown below controls when these sections are shown/hidden as the flow progresses.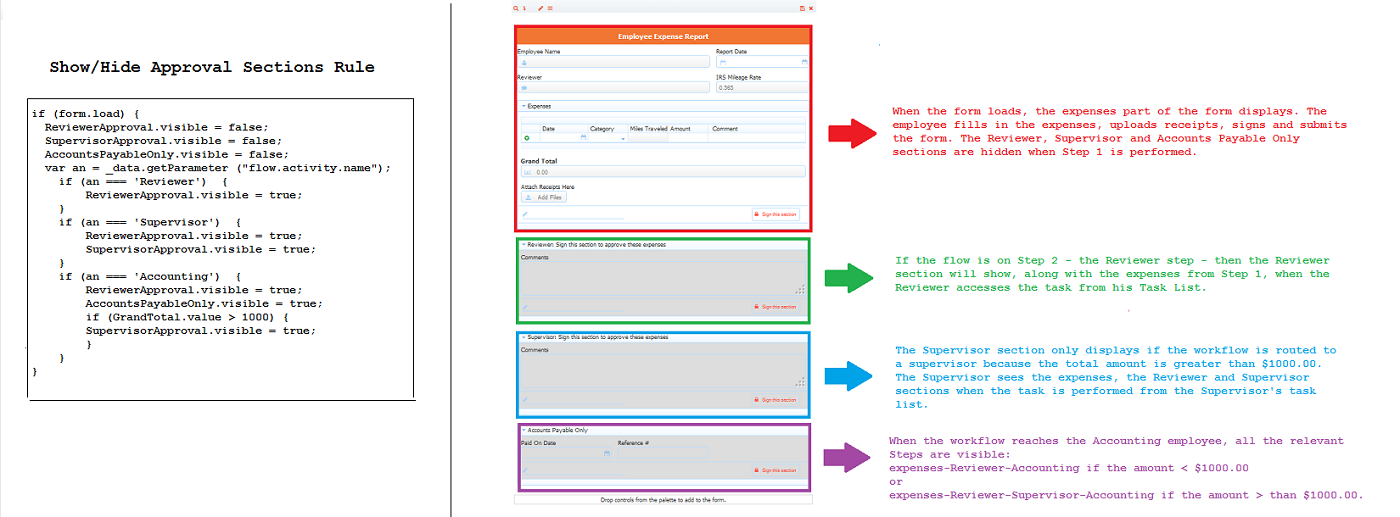
Rules will be even easier to implement in a future release of
Other Business Rules autofill the Report Date, employee information and the Reviewer name using the credentials of the user who is logged in. Another rule enables/disables the Miles Travelled field based on a selection from the Category dropdown. There is a rule to calculate the mileage and a separate rule to calculate the expense report grand total.
Using the Linked Forms Feature of the flow designer, we can add a linked version of the parent form, Expenses, for each of the remaining steps in the flow. Click the
 Link icon three times to create three linked forms.
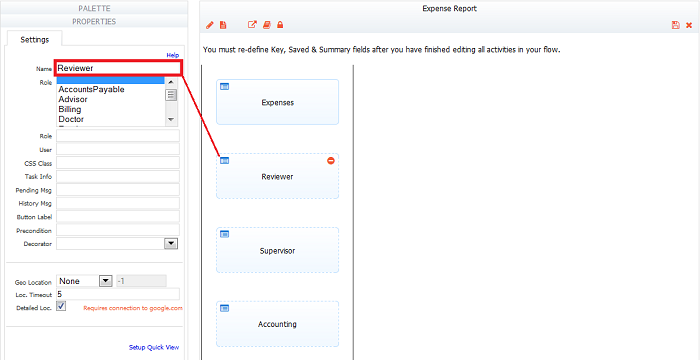
Click on the second step in the flow. Change the name to Reviewer, by typing it in the name field on the left step Property pane. Rename the third step in the flow, Supervisor and the last step Accounting.
Click the
 icon to save the flow.
Step 3: Assign Roles to the Workflow Steps
We will set up the navigation of the flow by assigning roles/users to the four steps:
Click the
 Edit icon to return to the Expense Report flow.
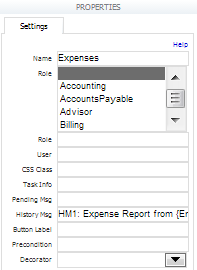
Select the step named Expenses. View the properties window on the left. A scrolling menu lists the available roles. Do not select a role for this step. This assignment makes the first step accessible to everyone in the
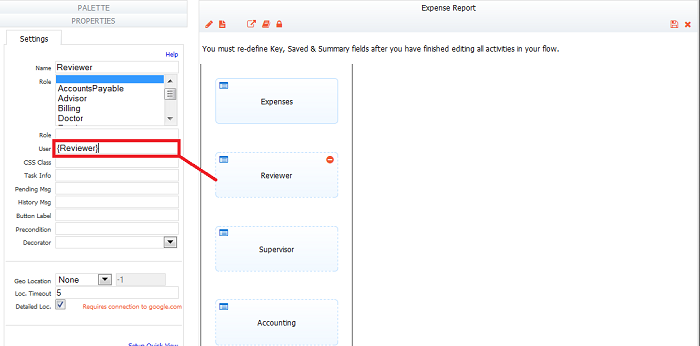
Select the Reviewer step. This step will be performed by the employee's manager (Reviewer). We could assign the role, Manager, by selecting it from the Role dropdown list, however, this would put a notification in every manager's inbox as soon as any employee in the company filed an expense report. We want each employee's expenses to be approved/rejected by his/her manager and not by any manager. Instead of assigning a role, we will assign this step to a specific user.
This is an example of a template in
Assign the Supervisor role to the Supervisor step.
Assign the Accounting role to the Accounting step.
Click the
icon to save the flow.
Step 4: Add a Precondition for the Supervisor Step
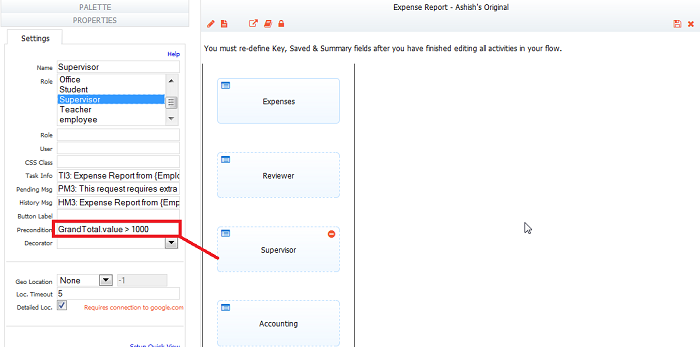
Preconditions are used to add logic to your flow to skip or perform a step when the condition is true. Add a precondition on the Supervisor step that will route the workflow to the Supervisor only if the Grand Total of the Expense Report is greater than $1000.00. If the amount of the workflow is less than $1000.00, the workflow will skip this step and route the task to the Accounting step.
To add the precondition:
- Click the
 Edit icon to return to the Expense Report flow.
 - Click on the Supervisor step.
- Type GrandTotal.value > 1000 into the Precondition field on the left step Property pane. GrandTotal is the name of the Total Amount control in the Expenses form.
- Click the icon to save the flow.
Step 5: Customize Notifications
The designer can customize the messages the users see, the task information that appears in the Task List, the messages the users see at the completion of each step, etc. We will supply some examples for you here but you can change these messages to say anything you want. Notice some control names are in between curly brackets. These are examples of templates - controls in your form that are evaluated at runtime and replaced with the actual value entered.
Follow the steps below to add some examples to the Expense Report flow
- Click the Edit icon to return to the Expense Report flow.
- Click on the Expenses step.
Type HM1: Expense Report from {EmployeeName} for ${GrandTotal} into the History Msg field on the step Property pane on the left. HM1 stands for History Message for the first step. The subsequent messages are numbered to distinguish them from each other when you test the flow. You will see this in the audit trail for the flow. The control name {EmployeeName} will be replaced by the with the user's name and the control name {GrandTotal} with the total amount of the Expense Report.
Click on the Reviewer Step.
Type TI2: Expense report for ${GrandTotal}.into the Task Info field on the step Property pane. You will see this message on the Task List for this step.
Type PM2: Your request has been sent to {Reviewer} into the Pending Message field on the step Property pane. The employee will see this message when he/she submits the form and the task is placed on the Reviewer's Task List
Type HM2: Expense Report from {EmployeeName} for ${GrandTotal}. This message will be added to the audit trail for this step.
- Click on the Supervisor Step.
- Type TI3: Expense report for ${GrandTotal}.into the Task Info field on the step Property pane. You will see this message on the Task List for this step.
- Type PM3: This request requires extra approval and has been sent to the Supervisor. into the Pending Message field on the step Property pane. The Reviewer will see this message if the task is routed to the Supervisor because the total amount is greater than $1000.00.
- Type HM3: Expense Report from {EmployeeName} for ${GrandTotal}. This message will be added to the audit trail for this step.
- Click on the Accounting Step:
- Type TI4: Expense Report from {EmployeeName} for ${GrandTotal} into the Task Info field on the step Property pane. You will see this message on the Task List for this step.
- Type PM4: Your request has been sent to Accounting for payment. into the Pending Message field on the step Property pane.
- Type HM4: Expense Report from {EmployeeName} for ${GrandTotal} into the History Msg field on the step Property pane on the left.
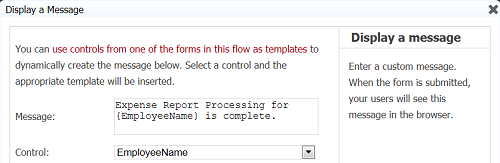
If you want to display a custom message such as "Expense Report Processing for {EmployeeName} is complete." after the Accounting user clicks Continue, click the
 what does the user see icon? on the flow designer toolbar to display the Form Action wizards , click on Display Message when users submit your form. Type your message in the Message box. Select the EmployeeName control from the control dropdown list. Click Finish.
Be sure to save the flow when these additions are completed.
Step 6: Run the Workflow
You can use Spaces to test this workflow or you can use the Share URL:
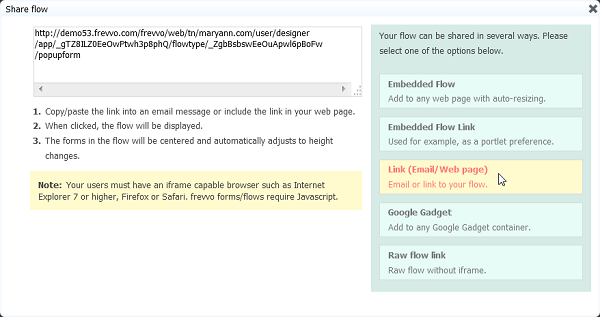
Share URL: Click the  Share icon for the workflow on the Flows Home Page and select the third option: Link (Email/Web page). Copy this link and paste it into a different browser.
 will display the login screen. Continue with the Employee Submission section below:
Spaces: A space is a frevvo website that can be used to test the Expense Report flow. It is very easy to create and add your forms and workflows to it. Follow these steps to create the space:
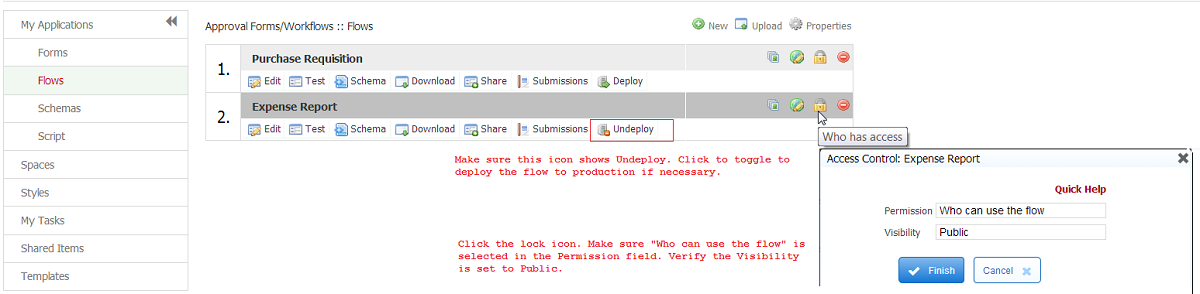
- Ensure the visibility of your Expense Report flow is set to public and that it is deployed to production:
- Click on the Spaces Tab. Click the icon. Enter an id and name for your space. Click Create.
- Click the
 Share icon. Copy the share url for your space then logoff
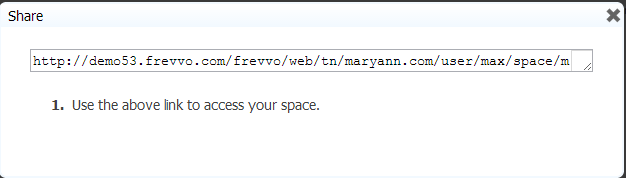
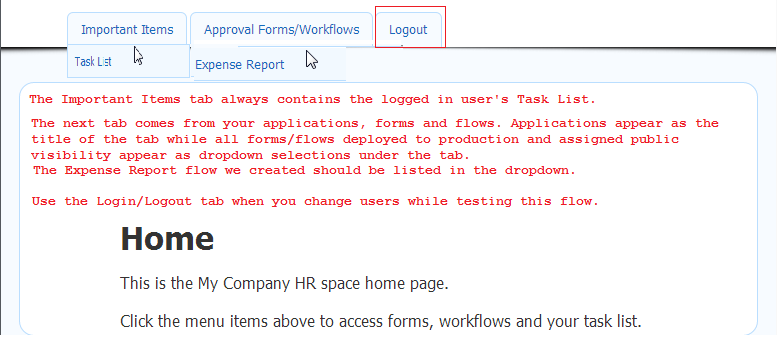
- Your space will look similar to the image below.
Employee Submission
Login as your designer user. If you are using a space for testing, select the Expense Report flow from the Approval Forms/Workflows tab. will display the first step in the workflow. This is just the Expense Report form except that the Manager Approval, Supervisor and Accounting sections are not visible. Notice the Employee Name, Reviewer user id and the current date are autofilled.
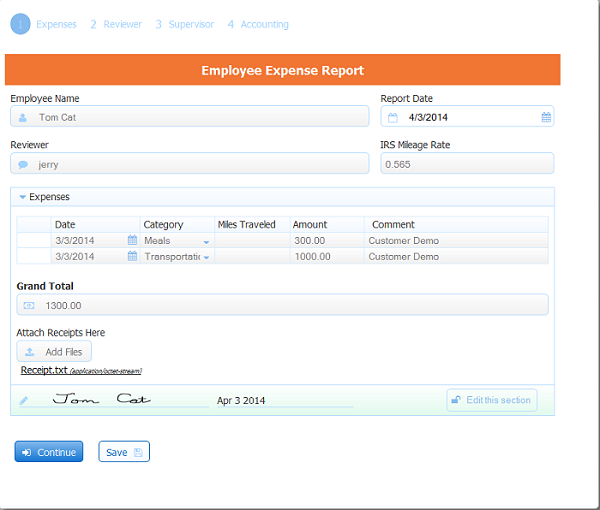
Enter data into the Expense Report so that the Grand Total is greater than $1000.00. After completing the Expense Report, click Continue to submit it to the reviewer. The Expense Report information cannot be edited by the reviewer. If you customized your pending messages, the designer user will see "PM2: Your request has been sent to jerry" (or whatever you changed it to) after pressing the Continue button. If you chose not to customize, the employee will see the default display message "Your request is being processed". Logout.
Reviewer Approval
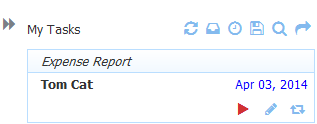
includes a built-in Task List for every user. Login as jerry who has the role of Reviewer. To access your Task List, click on the Tasks menu item on the left or if using a space, click the Important Items tab and then Task List. Tasks that are pending in your inbox will display. You can perform a task, modify them (abort or route to a different person) and view the history (audit trail) of a particular workflow.
Jerry will see any pending Expense Report approvals submitted by any of the employees he manages . Click the  Perform this Task icon for the task submitted by Tom Cat.
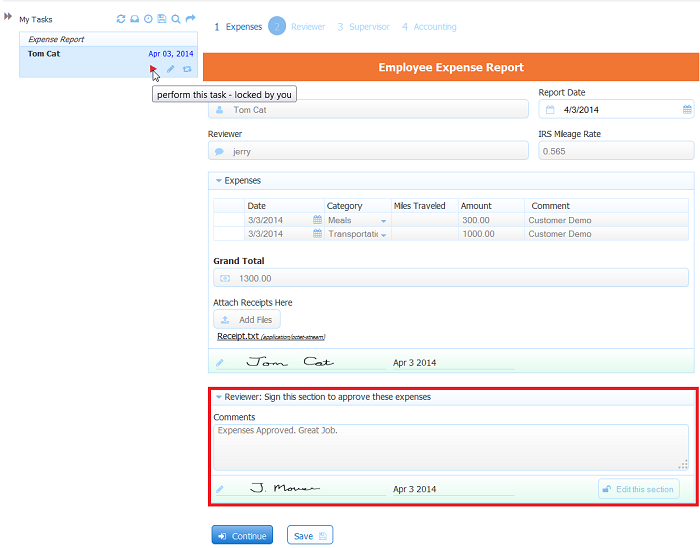
The Reviewer will see the Expense Report information submitted. It cannot be edited. However, because of the Role settings described earlier, the Reviewer will also see the Reviewer Approval section. He can approve or reject the Expense Report, enter any comments and sign the section. This step can easily be performed on an ios tablet or smart phone. will automatically adjust to the size of the the device and display the screens accordingly.
Enter comments and sign the section. Click Continue. If you customized your pending messages as suggested above, the Reviewer will see "PM3: This request requires extra approval and has been sent to the Supervisor". Logout. Since the Grand Total of the Expense Report is greater than $1000.00, the workflow will be routed to the Supervisor for an added approval.
Supervisor Approval
Login as a Supervisor. Click on the Task List or if using a space, click the Important Items tab and then Task List. Click the Perform this Task icon for the task submitted by Jerry Mouse. The Supervisor will see the Expense Report data, the Reviewer's approval and the Supervisor approval section.
Enter a comment and sign the section. Click Continue. The Supervisor will see this message if you customized your pending messages as described above: "PM4: Your request has been sent to Accounting for payment." Logoff.

Accounting Final Processing
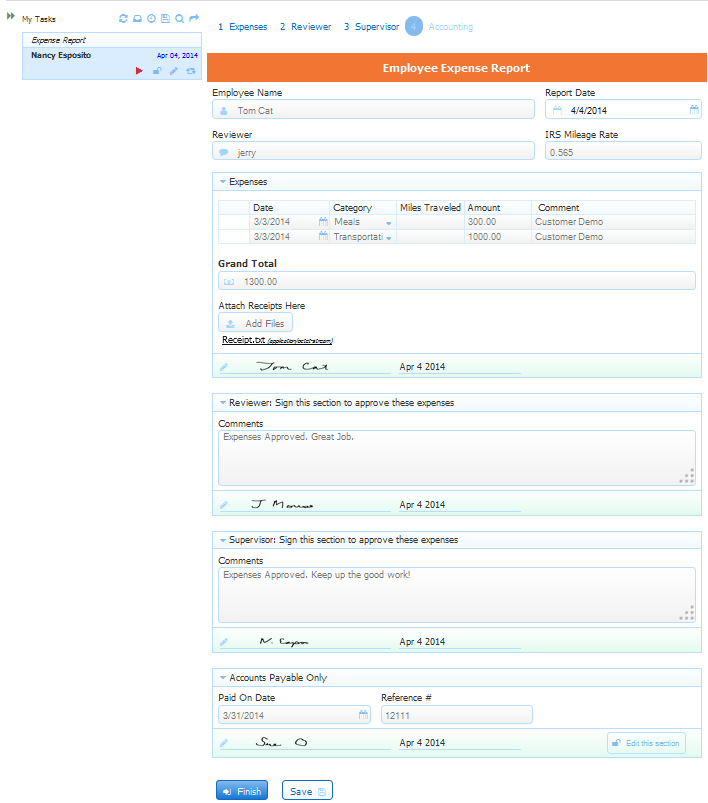
Login as a user with the Accounting role. Click on the Task List or if testing with a space, click the Important Items tab then Task List. Click the Perform this Task icon for the task submitted by the Supervisor. The accounting employee will see the Expense Report data, the Reviewer and Supervisor approvals and the accounting section for final processing.
Fill in and sign the Accounting section. Click Finish to complete the workflow. The Accounting user should see the message "Expense Report Processing for {emloyeename} is complete." Logoff.
Run the Expense Report workflow with a Grand Total that is less than $1000.00. Verify that the Supervisor step is skipped.