Live Forms v7.4 is no longer supported. Please visit Live Forms Latest for our current Cloud Release. Earlier documentation is available too.
Patient Referral Workflow Tutorial
- Former user (Deleted)
What are we going to build?
A common example of a workflow is a patient referral workflow between affiliated clinics and hospitals, where the clinics refer patients for procedures such as X-rays. Often, the referral process is paper-based. A nurse or physician's assistant fills out a paper referral form with patient information and requested procedures. A doctor must then sign the form. Once signed, the form is then faxed to the hospital where it is manually scanned or the data is entered into the hospital's document management or hospital administration system.
Using Live Forms, you can automate this entire workflow so that it is completely electronic and paperless.
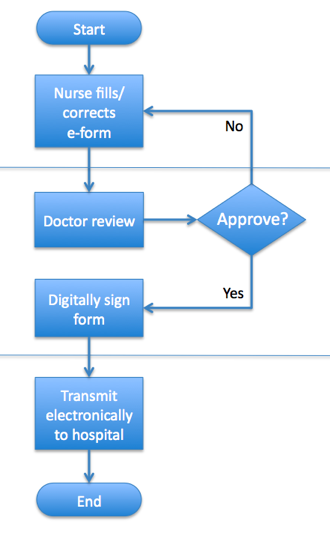
The steps are as shown in the figure:
- The nurse or physician's assistant goes to a web page that embeds the workflow. Live Forms makes this very easy to do.
- Since the Nurse does not belong to the 'doctor' role, she will only see the relevant portion of the form.
- The Nurse fills it in and clicks a Continue button.
puts the referral on the Doctor's task list, [optionally] notifies the Doctor by email and displays a confirmation message to the Nurse.
- When the Doctor logs in, she visits a web page that displays an electronic task list.
- All pending referrals will be displayed in the task list.
- The Doctor performs each referral. Since she belongs to the 'doctor' role, she will see the Doctor-specific portions of the form. The data entered by the Nurse is automatically populated for the Doctor to review.
- If the Doctor wishes to make changes, she can make them herself or send the form back to the Nurse to make the changes.
- Once she approves, she digitally signs the form and clicks Finish.
- The form data along with a PDF/TIF image is sent electronically to the hospital's document management or hospital administration system. The data can also optionally be saved in
On This Page:
Setup users and roles
This is a one-time setup that will have to be performed by an administrator.
For our example, we will need two roles 'Doctor' and 'Nurse'. To create these roles in :
- Login to frevvo as the administrative user for your tenant.
- Click the Manage link at the top right of the page.
- On the page that is displayed, click the 'Manage Roles' link.
- Click the
 icon and in the form that is displayed type in the desired role. Note that role names are case sensitive.
Creating the Radiology Referral Form
Read the general frevvo documentation on designing forms for a detailed discussion of and their features. In particular, make sure you understand the Name property of a control. You can find more information in the documentation.
- Create a new form and drag and drop controls as desired.
- In the Figure above, we have:
- Created a section for the Nurse to fill out patient information including procedure to be performed.
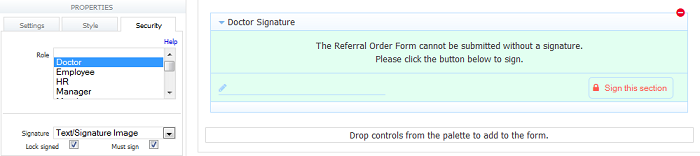
- Created a section for the Doctor called Doctor Signature.
- Enabled digital signatures for this Section. by clicking on the Section header and then on the Security Tab in the properties pane to the left. In the Security Tab, the Must Sign box is checked.
- Assigned role 'Doctor' to this Section. This ensures that the Section is only visible to logged in users with role 'Doctor', i.e. Nurses cannot see it.
Step 1a is not shown in the Radiology Referral form image above. You can drag and drop any controls you want. Make sure you drop at least two controls with labels 'First Name' and 'Last Name' respectively. You should also ensure that the Name field for these two controls shows the names FirstName and LastName respectively.
Creating the Workflow
Read the general documentation on designing flows for a detailed discussion of frevvo workflows and their features
1. Set the order of forms in your workflow
- Create a new flow by clicking on the Flows menu item and clicking the New button.
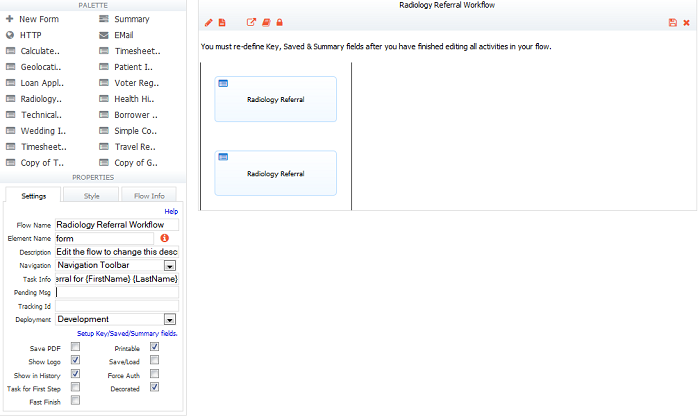
- Drag and drop forms into the flow as desired. The palette will display the Forms in your application including the Radiology Referral form we just created above.
- In the Figure above, we have dragged & dropped the Radiology Referral form twice into the workflow once for the Nurse and once for the Doctor.
- Create a new flow by clicking on the Flows menu item and clicking the New
2. Setup Roles/Task Info/Pending Message
.png?version=1&modificationDate=1509723202000&cacheVersion=1&api=v2&width=500&height=390)
- Click on the first step
- Leave the Role blank. Any logged in user can perform this step.
- Set the Button Label for the first step to 'Send to Doctor'.
- Click on the second step.
- Assign role 'Doctor' by selecting it in the properties panel.
- Set the Task Info to 'Referral for {FirstName} {LastName}'. This will be displayed in the Doctor's task list. As mentioned before, this will only work if you have controls in the form with names FirstName and LastName respectively.
- Set the Pending Msg to 'Your referral has been sent to a Doctor for approval.' This will be displayed on the Nurse's screen.
- Click on the first step
3. Notification Emails
You can configure email notifications for a particular step. In this example, an email would notify Doctors when referrals are pending for their approval.
- Click on the second step.
- Click the 'Setup Task Notification Email' link.
- In the wizard that is displayed, you can customize the subject as well as message content. You can use data from the flow by referring to controls in forms using templatized strings such as {FirstName}, {PatientName} etc.
4. Setup Actions
Configure form and document actions as desired. See general flows documentation for more information. When the flow is completed by the Doctor, you can send emails, save the document in a document management system, send data via HTTP POST to your web application etc. You can also configure what the user sees in detail.
5. Flow Permissions
Click the toolbar at the top of the Flow Designer. In the Flow properties panel,
- Give the workflow a name e.g. Radiology Referral Flow.
- In the Navigation drop down, select None. We do not want to show a Navigation toolbar at the top of this flow.
- Click the
 icon to display the Access Control wizard. When Who can use the flow is visible in the Permission drop down, select 'Public in Tenant'. This ensures that only users who are logged in to the same tenant will be allowed to use the workflow.
Finally, click the Finish button in the toolbar at the top.
Testing the Workflow
On the Flows page, click the Test button for your workflow. Make sure your user does not have the 'Doctor' role. will display the first step in the workflow. This is the Radiology Referral form, except that the Doctor Approval section is not visible.
Fill in the form and click the 'Send to Doctor' button. Since the second step in the flow was assigned the role 'Doctor' and you do not have the 'Doctor' role, will create a new task and put it on the Doctor's task list. In this case, any user with role 'Doctor' will be able to perform the task.
will also notify all users with role 'Doctor' that there is a new pending referral (these notifications can be turned on/off by individual users). Finally,
will display the Pending Msg that was configured 'Your referral has been sent to Dr. {ReferringPhysician} for approval.' on your screen. The templatized string {ReferringPhysician} will be replaced by the value of that control in the Referral form.
Task List
Read the task list documentation for a detailed discussion of task lists and their features
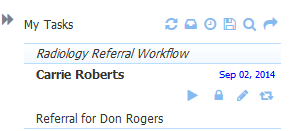
frevvo includes a built-in Task List for every user. This task list displays all pending tasks (in our example, pending referrals) for the user. To access the task list:
- Logout and login as the doctor user.
- You should see your Task List similar to the Figure above.
- You will see a task corresponding to the referral we just submitted above.
- You can view an audit trail, modify the task and perform it.
- Click the
 Perform this task (left most icon) icon.
 - The Radiology Referral form will be displayed in a popup window.
- The parts that were filled out by the Nurse will be automatically populated and the Doctor-specific signature Section will now be visible.
- After reviewing the information and making any changes, you must click the 'Sign this section' button to digitally sign the form.
- Click Finish to complete the workflow: this will cause all Form and Document actions to be executed.
Doctor Approval

In our example, when a doctor logs in and views the task list, he/she will see any pending referrals approval for their nurses. The doctor can then click the Perform this Task button.
The doctor will see the same referral information submitted and signed by the nurse. He will not be able to edi t this information, as the nurse has signed. However, because of the Role settings described earlier, the doctor will see the Approval section. He/She can approve or reject the expense report and enter any comments. Once the doctor has completed his approval/rejection, he may sign the section and finish the workflow.
Options for Signing
One signing option is the ability to perform a Wet signature. While the digital signature looks simply like a printed name, the wet signature option will trigger a lightbox allowing a person to draw in their signature. Wet signature support appears across all platforms and devices, allowing people to use tablet touchscreens as easily as a desktop computer.
Both options are available through the section tool, in the security tab. Simply drag an approval section in and add a comments text area. You can then edit the security settings to include a digital signature or a wet signature, depending on personal preference, business policy, or any other factions you might want to consider.
More information regarding signatures and signature types can be found on the signature page.
Quick View
Quick View can be used to complete approval and allow a doctor to more easily manage a list of tasks. Use of a Quick View is recommended at the first approval stage and at any type of review stage. Essentially, those who need to sign on a large number of submissions can use the Quick View to do that more efficiently. If a review stage is necessary, Quick Views also allow large numbers of submitted forms to be viewed and confirmed, rather than requiring users to click back and forth between the form viewer and the task list.
More information regarding Quick Views can be found in the 5.1 webinar video.
Sharing/Embedding the Workflow
The workflow can be easily shared or embedded in your web site. There are many flexible options for doing so. You can find instructions in the tutorial on embedding forms and workflows.